


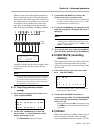

Section 9 – Synchronization with other DTRS units
06/97 – 1.00 – 9-3
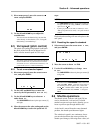
2) Use the
LEFT
and
RIGHT
keys to select the field
to be edited (hours, minutes, seconds or
frames) and the
UP
and
DOWN
keys to change
the value of that field.
You can use the function keys as number keys (see
5.2.2, “Using the function keys as number keys”)
to enter the value directly.
You can also change the sign of the offset value
between
and by moving the cursor to the sign.
3) Use the
ENTER
key to confirm the setting.
9.3.2 Cancelling machine offset
To cancel machine offset, simply set the offset
value to 00:00:00:00.
1) Press and hold down the
UP
key and press the
DOWN
key to reset the value in the
menu (see above).
Machine offset will now be cancelled.
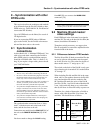
9.3.3 Setting machine offset “on the fly”
As well as entering an absolute number, it is also
possible to enter a number “on the fly” as the
tapes are playing.
1) On the slave machine, select menu group 3,
move the cursor to
, and press
ENTER
.
2) Make sure chase mode (see 9.2.3, “Master/slave
settings (CHASE mode)”) is off on the slave
unit.
3) Use the
LEFT
and
RIGHT
keys to move the
cursor to a second “invisible” field to the right
of the frames field
4) Locate the two tapes (master and slave) so that
they have the right offset.
You can play the tapes and pause them or carry out
the next operation while one or both tapes is being
played back.
5) Press either the
UP
or
DOWN
key at the correct
offset time to capture and store the offset.
The current difference between the master and
slave tapes will be be displayed on the bottom line
of the display screen and stored as an offset.
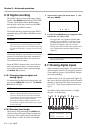
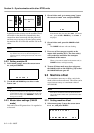
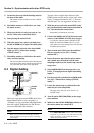
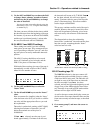
9.3.4 An example of setting offsets
A practical example of setting offsets is given
here.
The master DA-98 contains the tape with the dia-
log and reference tracks from the video worktape.
Another DA-98 (the slave) has a tape with some
tracks containing video backing music.It is neces-
sary to produce an offset between the two so that
when the master is played, the music tracks will
start at the correct time relative to the dialog and
reference tracks.
NOTE
There is an “invisible” field immediately to the right of
the frames field. If you place the cursor there and incre-
ment or decrement the value, you can change the time as
a whole (as the frame field passes its maximum value,
the seconds field will increment).
NOTES
The value entered in this way can be edited later using
the technique described above.
You cannot determine the offset from an unformatted
tape, or if either tape is currently displaying a negative
ABS value.
Backing music
Copy of video worktape audio tracks
Connection from
SYNC OUT to
SYNC IN
00:57:00:00
Start of tape
01:00:00:00
Start of video
01:02:21:18
Music entry
00:57:00:00
Start of tape
01:00:00:00
Start of music (tape
is cued here)
Press the UP or DOWN key
at this point. Offset will be
set to 00:02:21:18