


Table of Contents
06/97 – 1.00 – TOC-1
1 –Introduction to the DA-98
1.1 Unpacking
..................................................1-1
1.2 Features
.....................................................1-1
1.3 Using this manual
.....................................1-2
1.4 Precautions and recommendations
........1-2
1.4.1 Clock source in a digital studio
..................... 1-2
1.4.2 Confidence replay
....................................... 1-2
1.4.3 Environmental conditions
............................ 1-3
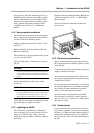
1.4.4 Installing the DA-98
..................................... 1-3
1.4.5 Electrical considerations
.............................. 1-3
1.4.6 Condensation
............................................ 1-3
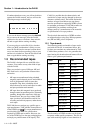
1.5 Recommended tapes
................................1-4
1.5.1 Tape brands
............................................... 1-4
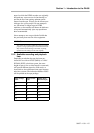
1.5.2 Available recording and playback time
........... 1-5
2 –Front Panel controls
[1] Power switch
.................................................2-1
[2] Tape counter and status indicators
....................2-1
[3] Tape loading slot
............................................2-1
[4] EJECT key
.....................................................2-1
[5] Display screen
...............................................2-1
[6] FORMAT/Fs indicators and switch
.....................2-1
[7] REF LEVEL (reference level indicators)
..............2-1
[8] Peak meters
...................................................2-1
[9] RHSL (F 1) key and indicator
............................2-2
[10] AUTO PUNCH (F 2) key and indicator
...............2-2
[11] CLEAR (F 3) key
............................................2-2
[12] AUTO PLAY (F 4) key and indicator
..................2-2
[13] MEMO 1 (F 5)
................................................2-2
[14] MEMO 2 (+/–)
................................................2-2
[15] DIGITAL IN switch and indicator
......................2-2
[16] CHASE switch and indicator
...........................2-2
[17] CONFIDENCE MODE switch and indicator
.........2-2
[18] ALL INPUT (F 6) key and indicator
....................2-2
[19] AUTO MON (F 7) key and indicator
...................2-2
[20] SHTL MON (F 8) key and indicator
....................2-3
[21] REPEAT (F 9) key and indicator
.......................2-3
[22] LOC 1 (F 10) key
...........................................2-3
[23] LOC 2 (PRESET) key
......................................2-3
[24] SHIFT key and indicator
.................................2-3
[25] CURSOR keys
..............................................2-3
[26] SHUTTLE switch, indicator and control
.............2-3
[27] ENTER and ESCAPE keys
..............................2-3
[28] REC FUNCTION switches and indicators
...........2-3
[29] INPUT MONITOR switches and indicators
.........2-3
[30] CLOCK switch and indicators
.........................2-3
[31] TC REC switch and indicator
...........................2-4
[32] REW key
......................................................2-4
[33] F FWD key
...................................................2-4
[34] STOP key
....................................................2-4
[35] PLAY key
.....................................................2-4
[36] RECORD key
................................................2-4
3 –Rear Panel connectors
[37] TIME CODE (IN and OUT)
................................3-1
[38] VIDEO (IN/THRU)
...........................................3-1
[39] WORD SYNC (IN/OUT/THRU)
...........................3-1
[40] RS-422
........................................................3-1
[41] MIDI IN/OUT/THRU
........................................3-1
[42] CONTROL I/O
...............................................3-1
[43] REMOTE IN/SYNC IN
.....................................3-1
[44] SYNC OUT
...................................................3-1
[45] TDIF-1 (DIGITAL I/O)
......................................3-1
[46] METER UNIT (MU-8824)
................................. 3-1
[47] ANALOG INPUT
........................................... 3-1
[48] ANALOG OUTPUT
........................................ 3-1
[49] ~ IN
............................................................ 3-1
4 –Connections
4.1 Audio connections
.................................... 4-1
4.1.1 Analog audio connections
........................... 4-1
4.1.2 Digital audio connections
............................ 4-1
4.2 Synchronization connections
.................. 4-1
4.2.1 Analog timecode connections
...................... 4-1
4.2.2 Video connections
...................................... 4-2
4.2.3 Word clock connections
.............................. 4-2
4.3 Control connections
................................. 4-2
4.3.1 RS-422 connector
....................................... 4-2
4.3.2 MIDI connectors (IN , OUT and THRU)
............ 4-2
4.3.3 Parallel control
.......................................... 4-3
4.4 Connection to other TASCAM units
........ 4-3
4.4.1 Multiple DTRS units
.................................... 4-3
4.4.2 “Indirect” word sync
................................... 4-3
4.4.3 Meter unit (MU-8824)
................................... 4-3
5 –Menu operations
5.1 The menus
................................................. 5-1
5.1.1 Navigation around the menu system
.............. 5-1
5.1.2 Using the ENTER key
.................................. 5-1
5.1.3 The ESCAPE key
........................................ 5-1
5.1.4 Editing values
............................................ 5-1
5.1.5 Resetting a menu value
............................... 5-2
5.1.6 Changing menu values fast
.......................... 5-2
5.1.7 Blanking the screen display
......................... 5-2
5.2 Function key modes
................................. 5-2
5.2.1 The SHIFT key and function keys
.................. 5-3
5.2.2 Using the function keys as number keys
........ 5-3
5.3 Assigning menus to function keys
......... 5-4
5.3.1 To assign a menu screen to a key
................. 5-4
5.3.2 Recalling an assigned menu function
............ 5-4
6 –Basic operations
6.1 Formatting a tape
...................................... 6-1
6.1.1 Aborting the format process
........................ 6-1
6.1.2 Recording while formatting
.......................... 6-2
6.2 Recording the first tracks
........................ 6-2
6.3 Preparing to record
................................... 6-2
6.3.1 Write-protecting cassettes
........................... 6-2
6.3.2 Recording the basic tracks (i)
....................... 6-2
6.3.3 Recording the basic tracks (ii)
...................... 6-3
6.3.4 Replaying the first tracks
............................. 6-3
6.4 Overdubbing
.............................................. 6-3
6.5 Track bouncing
......................................... 6-3
6.6 Punch-in and punch-out
........................... 6-3
6.6.1 Automatic punch point setting
...................... 6-4
6.6.2 Setting punch points “on the fly”
.................. 6-4
6.6.3 Setting punch points using the menus
........... 6-5
6.6.4 Editing the pre-roll and post-roll times
........... 6-5
6.6.5 Rehearsing the punch-in
............................. 6-6
6.6.6 Interrupting a rehearsal or punch recording
.... 6-6
6.6.7 Recording the punch-in
............................... 6-6
6.6.8 Replaying the punched material
.................... 6-7
6.6.9 Exiting punch-in mode
................................ 6-7