


Selecting Layers 21
01V96i—Owner’s Manual
Operating Basics
Confirmation Messages
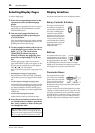
For certain functions, the 01V96i prompts you for con-
firmation before executing the functions, as shown here.
Move the cursor to YES and press [ENTER] to execute
the function, or move the cursor to NO and press
[ENTER] to cancel.
If you take no action for awhile, the confirmation win-
dow closes automatically and the function is not exe-
cuted.
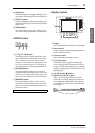
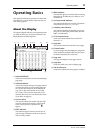
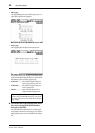
Title Edit Window
The Title Edit window enables you to enter titles for
Scene and library memories. You can enter 4, 12, or 16
characters, depending on the item.
The figure on the left shows uppercase characters and
various punctuation marks. The figure on the right
shows lowercase characters and numbers.
Use the cursor buttons to select characters, and press
the [ENTER] button to enter them into the title. The
cursor moves to the right automatically as each charac-
ter is entered. Use the Parameter wheel to move the cur-
sor within the title.
Use the SHIFT LOCK button to select uppercase or
lowercase characters, and use the SPC button to enter a
space.
To insert a space at the cursor position and move sub-
sequent characters to the right, move the cursor to the
INS button and press [ENTER].
To delete the character at the cursor position and move
subsequent characters to the left, move the cursor to the
DEL button and press [ENTER].
When you have finished, move the cursor to the OK
button, then press [ENTER] to confirm the title. To
cancel the title entry, move the cursor to the CANCEL
button, then press [ENTER].
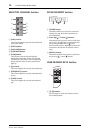
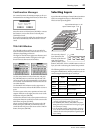
Selecting Layers
Input Channels and Output Channels (Bus Outs & Aux
Outs) are arranged into layers, as illustrated below.
There are four layers altogether.
The currently-selected
layer determines the
function of the channel
strip, [SEL] buttons,
[SOLO] buttons, [ON]
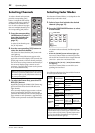
buttons, and faders. Use the LAYER buttons to select a
layer you wish to edit using the channel strip controls.
The following table shows the layers that you can access
using the LAYER buttons, and the parameters you can
control using the channel strips on each layer.
LAYER
buttons
Layers
Channel Strips
1–8 9–16
[1–16]
button
Input Channel
Layer 1–16
Input Channels 1–16
[17–32]
button
Input Channel
Layer 17–32
Input Channels 17–32
[REMOTE]
button
Remote Layer
Operation depends on the
selected target.
[MASTER]
button
Master Layer
Aux Send
masters 1–8
Bus Out mas-
ters 1–8
Tip:
• The function of each channel strip fader depends on the
currently-selected Fader mode (see page 22).
• The STEREO [SEL] button, [ON] button, and [STE-
REO] fader always control the Stereo Out signal, regard-
less of the Layer settings.
• The ST IN [SEL] buttons, [SOLO] buttons, [ON] but-
tons, and level control knobs always adjust the ST IN
channels selected via the [ST IN] button regardless of the
Layer settings.
Input Channel Layer 17–32
Input Channel Layer 1–16
Remote Layer
Master Layer
1-16 17-32 MASTER REMOTE
LAYER