


9
Style Record mode
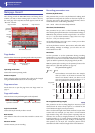
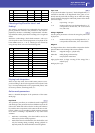
Main page - Record 2/Cue
Advanced
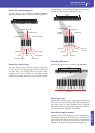
Delete Note button
Use this command to delete a single note or a single percussive
instrument from a track. For example, to delete a snare, keep the
D2 note (corresponding to the snare) pressed.
1. Select a track.
2. Touch the “Delete Note” button, and keep it pressed.
3. Press START/STOP to start the Style.
4. When you reach the passage containing the note to be
deleted, play the note on the keyboard. Keep it pressed, up
to the last note to be deleted.
5. When finished, release the Delete button and the note to be
deleted, and press START/STOP again to stop the Style.
Note: If the note is at the beginning of the pattern, press the
note before starting the Style.
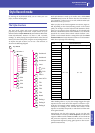
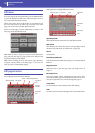
Tracks volume/status area
Virtual sliders
Each virtual slider in the display corresponds to an Assignable
Slider on the control panel. Use the Assignable Sliders to change
each value, provided the VOLUME LED (over the SLIDER
MODE button) is turned on. This LED status depends on the
last selected Performance, but can be changed anytime by using
the SLIDER MODE button.
As an alternative, touch the track’s area to select a track, and use
VALUE controls to change the value (or touch and drag it in the
display).
Track status icons
Status of tracks. Touch this icon to change the status.
Play status. The track can be heard.
Mute status. The track cannot be heard.
Record status. After starting recording, the track
will receive notes from the keyboard and the
MIDI IN connector.
Track names
Under the sliders, a label for each track is shown.
Drum…Acc5 Shown Style tracks.
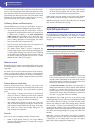
Main page - Record 2/Cue
While in the main page, touch the “Record 2/Cue” tab to see this
page. Most parameters in this page are the same as in “Main page
- Record 1”. In addition, here you can see and select Sounds for
each Style track, and the Cue mode for the Style Element.
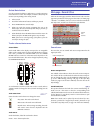
Sounds area
This area lets you see Sounds and octave transposition for the
eight Style tracks.
Octave transpose icon
Non editable. This indicator shows the track’s octave transposi-
tion. Tracks will be recorded with the selected octave transposi-
tion. To change this value, use the UPPER OCTAVE buttons, or
go to the “Mixer/Tuning: Tuning” edit page in the Style Play
mode (see page 123 of the User’s Manual). Save this value to the
Style Settings.
Sound bank’s icon
This picture illustrates the bank the current Sound belongs to.
Touch an icon a first time to select the corresponding track
(detailed information are shown on the Selected Track Info area,
see the “Record 1” page above). Touch it a second time to open
the Sound Select window.
Note: These Sounds can be replaced by Sounds selected by a Per-
formance, provided the “Original Style Sounds” parameter is left
unchecked in Style Play mode (see page 114 of the User’s Manual).
PA D
Sounds
area
Cue area
Octave transpose icon
Sound bank’s icon