


63
Appendix
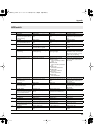
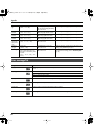
Parameters that can change the start-up state
Parameter
Range (display indication) Panel operation Remarks
Fixed Velocity
16–127
(“ 16”–“127”)
[FIXED VELOCITY] + CTRL 3 knob Specifies the velocity value when FIXED VELOCITY (p.
16) is on. After making the setting, press [FIXED VE-
LOCITY] + [SAMPLING] to save it.
Pad Sens Light, Midium, Heavy
(“-L-”, “-M-”, “-H-”)
[CANCEL] + [FIXED VELOCITY]
➜
CTRL 3 knob
Specifies the pad sensitivity (p. 16). After making the
setting, press [SAMPLING] to save it.
Roll Resolution quarter note, quarter note triplet,
8th note, eighth note triplet, 16th
note, 16th note triplet, 32nd note,
32nd note triplet
(“ 4 “, “4.3”, “ 8 “, “8.3”, “16
“, “16.3”, “32 “, “32.3”)
[ROLL] + CTRL 3 knob Specifies the roll speed when ROLL (p. 16) is on. After
making the setting, press [ROLL] + [SAMPLING] to save
it.
Effect Tempo
Mode
Standerd, Sequencer
(“Std”, “SEq”)
[CANCEL] + [TAP TEMPO]
➜
CTRL 3 knob
Specifies whether the tempo of the effect will follow the
pad or pattern sequencer (Standard) or will always fol-
low the pattern sequencer (Sequencer) (p. 20). After
making the setting, press [SAMPLING] to save it.
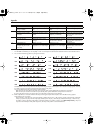
Effect Assign
Mode
Auto, Manual
(“AUt”, “MAn”)
[CANCEL] + [EFFECT ASSIGN]
➜
CTRL 3 knob
Specifies whether a pad’s EFFECT ASSIGN will auto-
matically switch to follow the current pad (Auto), or is
changed only by [EFFECT ASSIGN] + Pad (Manual).
After making the setting, press [SAMPLING] to save it.
MIDI ch 1–15
(“C. 1”–“C.15”)
[PATTERN SELECT] + Power On
➜
Bank [A]
➜
CTRL 3 knob
Specifies the MIDI transmit/receive channel (p. 71). Af-
ter making the setting, press [SAMPLING] to save it.
MIDI Through Off/On
(“oFF”/“ on”)
[PATTERN SELECT] + Power On
➜
Bank [B]
➜
CTRL 3 knob
After making the setting, press [SAMPLING] to save it.
Sync Mode Auto Sync, Tempo Sync, Off
(“AUt”, “tmP”, “oFF”)
[TIME/BPM] + Power On
➜
Bank [A]
➜
CTRL 3 knob
Specifies the MIDI synchronization mode (p. 69). After
making the setting, press [SAMPLING] to save it.
Sync Source MIDI, USB
(“Mid”, “USb”)
[TIME/BPM] + Power On
➜
Bank [B]
➜
CTRL 3 knob
Specifies whether the SP-555 will synchronize to the
MIDI clock from the MIDI connector (MIDI), or the MIDI
clock from USB MIDI (USB). After making the setting,
press [SAMPLING] to save it.
Tx MIDI Sync Off/On
(“oFF”, “ on”)
[TIME/BPM] + Power On
➜
Bank [C]
➜
CTRL 3 knob
Turns MIDI clock transmission on/off. After making the
setting, press [SAMPLING] to save it.
D Beam Sens 0–127
(“ 0”–“127”)
[CANCEL] + [SYNTH]/[FILETR]/
[TRIGGER]
➜
CTRL 3 knob
Adjusts the sensitivity of the D Beam controller. After
making the setting, press [SAMPLING] to save it.
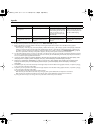
V-LINK Ctrl
Ach
1–16
(“C. 1”–“C.16”)
[CANCEL] + [V-LINK]
➜
Bank [A]
➜
CTRL 3 knob
This can also be changed by Pad [1]–[16]. After mak-
ing the setting, press [SAMPLING] to save it.
V-LINK Ctrl
Bch
1–16
(“C. 1”–“C.16”)
[CANCEL] + [V-LINK]
➜
Bank [B]
➜
CTRL 3 knob
This can also be changed by Pad [1]–[16]. After mak-
ing the setting, press [SAMPLING] to save it.
V-LINK Ctrl
Cch
1–16
(“C. 1”–“C.16”)
[CANCEL] + [V-LINK]
➜
Bank [C/G]
➜
CTRL 3 knob
This can also be changed by Pad [1]–[16]. After mak-
ing the setting, press [SAMPLING] to save it.
V-LINK Sw
Mode
Standerd, MD-P1
(“Std”, “MdP”)
[CANCEL] + [V-LINK]
➜
[FIXED VELOCITY]
➜
CTRL 3 knob
Specifies what will happen when V-LINK is switched
on/off. With the Standard setting, only the V-LINK On/
Off message is sent. Set this to MD-P1 when using the
“MD-P1.” After making the setting, press [SAMPLING]
to save it.
CTRL 1 Assign Off, 1–30
(“oFF”, “ 1”–“ 30”)
[CANCEL] + [V-LINK]
➜
Sw bellow CTRL 1
➜
CTRL 3 knob
After making the setting, press [SAMPLING] to save it.
CTRL 2 Assign Off, 1–30
(“oFF”, “ 1”–“ 30”)
[CANCEL] + [V-LINK]
➜
Sw below CTRL 2
➜
CTRL 3 knob
After making the setting, press [SAMPLING] to save it.
CTRL 3 Assign Off, 1–30
(“oFF”, “ 1”–“ 30”)
[CANCEL] + [V-LINK]
➜
Sw below CTRL 3
➜
CTRL 3 knob
After making the setting, press [SAMPLING] to save it.
SP-555_e.book 63 ページ 2007年6月25日 月曜日 午前9時9分