


26
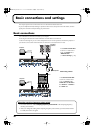
Basic connections and settings
This chapter explains basic connections for the UA-1000 and describes the data flow.
* To prevent malfunction and/or damage to speakers or other devices, always turn down the volume, and turn
off the power on all devices before making any connections.
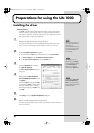
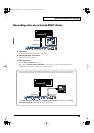
Basic connections
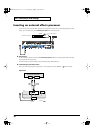
Use a USB cable to connect the UA-1000 to your computer.
Connecting the USB cable allows both MIDI data and audio data to be transferred.
As shown in the diagram, you can connect headphones and/or monitor speakers to monitor the playback of
your software or the sound of the instruments or audio devices connected to the UA-1000.
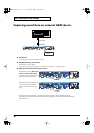
fig.b
asic
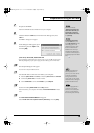
In the
OUTPUT PATCH BAY
section of UA-1000 Control
Panel, set
OUTPUT 1-2
to
“MONITOR OUT.”
(->
“Various settings”
(p. 36))
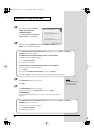
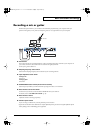
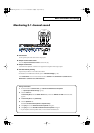
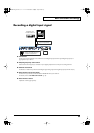
When using a mixer
fig.m
ixer
In the
OUTPUT PATCH BAY
section of UA-1000 Control
Panel, set
OUTPUT 1-2
to
WAVE OUT 1-2
,
OUTPUT 3-
4
to
WAVE 3-4
...
OUTPUT 7-
8
to
WAVE 7-8
.
USB cable
Computer
USB
Amplified
speakers
Headphones
USB
USB cable
Computer
Mixer
About the sampling frequency select switch
• You must set the UA-1000’s sampling frequency select switch to the sampling frequency
used by your software.
• After you change the setting of the sampling frequency select switch, you must switch off the
UA-1000, then turn it on again.
UA-1000_e.book 26 ページ 2003年8月6日 水曜日 午前11時52分