


r
E-200/E-100
22
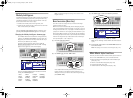
Your E-200/E-100 contains a 16-track Recorder you can use for recording your own songs.
Basic song recording
Let us first look at the most straight-forward way of recording
your renditions with Arranger backing.
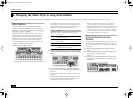
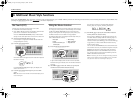
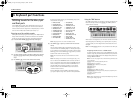
(1) Press the [ARRANGER] button.
The icon appears. You can now use your left
hand for transposing the Arranger’s key in realtime.
(2) Press the [STYLE] button and select a Music Style (or select
a Music Assistant memory).
(3) Select the desired Arranger division by pressing [INTRO],
[ORIGINAL] or [VARIATION].
Note: [INTRO] is automatically selected when you press
[ARRANGER].
(4) Press the [START÷STOP] button.
(5) Use [TAP¥TEMPO] or the [NO/–]/[YES/+] buttons to set
desired tempo.
(6) Press [START÷STOP] again to stop Arranger playback.
(7) Assign the desired Tone to the right half of the keyboard.
Press [TONE] and use the FAMILY & SELECT [√][®] buttons or
the buttons in the TONE section. See also page 28.
Note: After pressing [ARRANGER], the OTP1 memory automati-
cally assigns a suitable sound to the Main part.
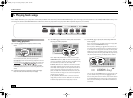
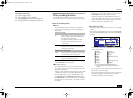
(8) Press the [REC≈∏] button.
The display should look as shown above (if it doesn’t, use the
FAMILY [√][®] buttons (“REC MODE”) to select REC All):
(The [RECORD≈∏] and [1]~[16] icons flash.) You are now in ALL
mode, which means that everything you and the E-200/
E-100’s Arranger play will be recorded.
Note: If you select “REC ALL” with the FAMILY buttons, the song
in the E-200/E-100’s USERSONG memory is erased. You may
want to save the current song first (see p. 45). If you only
pressed [REC≈∏], the E-200/E-100 selects the Single mode if the
USERSONG memory already contains data. See page 24 for
details about that mode.
(9) Start recording in one of the following ways:
• Press the [START÷STOP] button to start Arranger playback
with the selected Division.
The [V-LINK] button now flashes to indicate the tempo and
beats (BEAT function).
Note: If you start recording without the Arranger and want to
bring it in at a later stage, it would be a good idea to switch on
the metronome by pressing the [METRONOME] button.
• Activate the [SYNC¥START] button (if it is off) and press one
or several keys to the left of the Split point.
Note: It is also possible to record in PIANO SOLO mode (after
pressing the button of the same name). In that case, you should
definitely use the metronome. The song’s time signature can be
set with the MetroTS function. See page 12.
(10) Stop recording in one of the following ways:
• Press [START÷STOP].
• Press the [ENDING] button to start the Ending phrase. As
soon as it ends, Arranger playback and song recording stop.
7. Recording your music
ARRANGER
● REC
INTRO
FULL
BAND
=
1
9
2
10
3
11
4
12
5
13
6
14
7
15
8
16
ORCHESTRATOR BEAT
ALL
120 001
START / STOP
ORIGINAL
|√
E-200_US Page 22 Tuesday, January 27, 2004 4:01 PM