


r
E-200/E-100
8
M
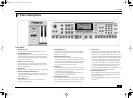
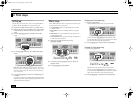
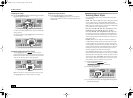
BAND ORCHESTRATOR section
Press one of these buttons to choose the desired orchestra-
tion for the selected Music Style. See page 20.
N
ARRANGER & SONG CONTROLS section
[SYNC¥START/MARKER¥A–B]
button: This button performs
two functions: In Arranger mode (while using the automatic
accompaniment), it allows you to switch the SYNC START
function on and off.
In Song mode, it can be used to specify the beginning (“A”)
and end (“B”) of the passage that should be repeated.
The remaining buttons in this section allow you to control
Arranger or Recorder playback. See pages 13 and 16.
O
STYLIST section
The buttons in this section provide access to pre-pro-
grammed templates that allow you to quickly modify Music
Styles’ or Standard MIDI File’s character. See page 20.
When the Minus One function is on, these buttons allow you
to quickly mute several Standard MIDI File parts (these mute
functions are not available while you are using the Arranger
function).
P
ONE TOUCH PROGRAM section
These buttons allow you to quickly configure the E-200/
E-100 for use with (
[ARRANGER]
) or without (
[PIANO]
) auto-
matic accompaniment. At power-on, the E-200/E-100
selects the PIANO SOLO mode.
Press the
[OTP1/OTP2]
button to select the desired One
Touch settings. These two memories (“1” and “2”) contain a
number of settings that complement the currently selected
Music Style. There are two One Touch memories per Music
Style. See p. 26.
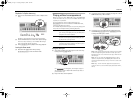
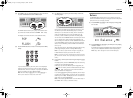
Q
[MUSIC ASSISTANT] button
This button allows you to work with pre-programmed regis-
trations (additional User Programs). See p. 26.
Note:
Press this button twice in succession (“double-click”) so
that it flashes to select the desired memory using the numeric
buttons.
R
[SONG] button
This button allows you to select the E-200/E-100’s Song
mode and to specify that the
[INTRO]
,
[ORIGINAL]
, etc., but-
tons should be used to operate the on-board Recorder.
Note:
Press this button twice in succession (“double-click”) so
that it flashes to select the desired memory using the numeric
buttons.
S
[STYLE] button
Press this button if you want to select Music Styles. By acti-
vating this button, you also specify that the
[INTRO]
,
[ORIGINAL]
, etc., buttons are used for selecting a Style Divi-
sion, while the numeric buttons can be used to select the
desired Style family.
Note:
Press this button twice in succession (“double-click”) so
that it flashes to select the desired memory using the numeric
buttons.
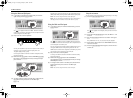
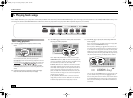
T
[TONE] button
Press this button if you want to use the FAMILY and SELECT
[√][®]
for assigning a sound (“Tone”) or Drum Set to the Main,
Split or Dual part. See p. 28.
Note:
Press this button twice in succession (“double-click”) so
that it flashes to select the desired memory using the numeric
buttons.
U
DATA ENTRY buttons
FAMILY
and
SELECT
[√][®]
buttons: The FAMILY and SELECT
[√][®]
buttons are used to select Tones, Styles, Music Assistant
memories, Songs, and Function parameters. The FAMILY
[√][®]
buttons allow you to select a group. You can press them,
hold them, or press one while holding the other to change
the scrolling speed.
The SELECT
[√][®]
buttons allow you to choose items within
the selected group or family. You can press them, hold them,
or press one while holding the other to change the scrolling
speed. After selecting the last item of the currently selected
group, pressing
[®]
again takes you to the first entry of the
following group. Conversely, pressing
[√]
again after select-
ing the first entry of a group takes you to the last entry of
the preceding group.
STYLE buttons:
These buttons allow you to select Style
families and can also be used for entering numbers and
characters when writing names. After double-clicking the
[STYLE]
,
[TONE]
,
[SONG]
or
[MUSIC¥ASSISTANT]
button, they
also allow you to select the desired memory/entry.
The TEMPO/DATA
[NO/–]
/
[YES/+]
buttons allow you to set the
arranger or Song tempo and the value of the selected FUNC-
TION parameter.
Note:
The E-100 doesn’t have a disk drive. That is why the
[DISK]
button (disk Style selection) is called
[USER¥STL]
. (It allows you to
select the Style family of the same name.)
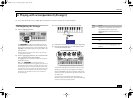
V
[FUNCTION] button
This button provides access to the FUNCTION menu. You can
use the FAMILY and SELECT
[√][®]
buttons to select the
desired function.
W
[DISK] button
[E-200 only]
Press this button to access the Disk functions. They are used
for loading data from floppy, saving data to disk, and man-
aging floppy disks. See p. 48.
Note:
You can also save and load data via USB.
X
[USER PROGRAM/WRITE] button
Press this button whenever you want to select a User Pro-
gram (a set of registrations). Press and hold it to save the
current panel and parameter settings to a User Program. See
page 41.
Y
TONE section
These buttons allow you to select the “best” sound of the
indicated family (i.e. the “best” piano, organ, guitar/bass, etc.
sound). After selecting one of these favorites, you can use
FAMILY
[√][®]
and SELECT
[√][®]
to select other families and
other Tones within the active family.
Z
Disk drive
[E-200 only]
, in the middle below the keyboard (not
pictured)
This is where you insert floppy disks with Standard MIDI Files
or Music Styles you may already own. The drive accepts 2DD
(720kB) and 2HD (1.44MB) floppy disks.
E-200_US Page 8 Tuesday, January 27, 2004 4:01 PM