


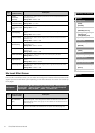
Internal Design of the CP5 & CP50
Reference
Left & Right Parts
[VOICE]
[PRE-AMP]
[MOD-FX]
[PWR-AMP] (CP5 only)
[LEFT1]/[LEFT2]/[RIGHT1]/
[RIGHT2] (CP5)
[LEFT]/[RIGHT] (CP50)
[COMMON]
Song Setting Area
[SONG SETTING]
[RECORD]
TRACK Part
[TRACK]
MIC INPUT Part
[MIC INPUT] (CP5 only)
Settings for All Parts
[REVERB]
Settings for All Performances
[MASTER COMPRESSOR]
[UTILITY]
[FILE]
Appendix
37 CP5/CP50 Reference Manual
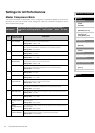
Record Screen
The Record screen allows you to record User Songs or Wave files for use as backing tracks, and it
contains four individual pages.
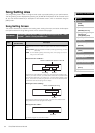
Edit Sequence
Press the [RECORD] button Navigate to the required page using the [ PAGE] and
[PAGE
] buttons Turn or press Knobs 1 to 3
Page
On-screen name
(and full name)
Description
1 Rec (Recording Type) Modified using Knob 1, this parameter specifies the type of data to be
recorded. Select “Song” to record your performance as a User Song, or select
“Wave” to record it as a Wave file on a USB flash-memory device plugged into
the stage piano.
Setting values: Song (User Song) or Wave (Wave file)
Song
If Type has been set to “UsrSong” on the Song Setting screen (page 35), indicating
that a User Song is to be used as the backing track, the User Song selected on that
screen will be used to record your performance data. Alternatively, if Type has been
set to “PreDrum” or “Wave”, indicating that a Preset Drum Pattern or Wave file is to be
used as the backing track, an empty User Song will be automatically selected for
recording of your performance data. If, however, no empty User Songs are available,
a message will be displayed to notify you of this. In order to proceed with recording in
such a case, you will first of all need to delete an unneeded User Song via the Song
Setting screen (page 35).
Wave
When this option is selected, your performance will be stored as a Wave file on a USB
flash-memory device plugged into the stage piano, and an unused name will be auto-
matically chosen for that file.
Name This parameter is available only when Rec is set to “Wave”. In such a case,
press Knob 3 to open the Name screen and specify a new name for the Wave
file to be recorded. On this screen, you can turn Knob 1 (Cursor) to move the
cursor within the displayed name. Then, using Knob 2 (Data), you can change
the character at the cursor position. Wave file names can contain upper case
letters, numbers, and symbols. When you have finished specifying a name,
press the [ENTER] button to return to Page 1 of the Record screen. If a Wave
file with the same name already exists on the USB flash-memory device
plugged into your CP5 or CP50, an error message will be displayed when you
try to start recording. In such a case, specify a different name and press the
[ENTER] button once again. To return to the Record screen without specifying a
new name, press the [EXIT] button.
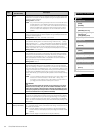
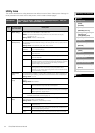
Name screen
NOTE
Whenever Wave files are being recorded on your CP5 or CP50, the
characters } and { are automatically added to the file name at the 7th and
8th positions, and they cannot be changed on this screen. Although names
can be edited after recording, these two characters should not be removed.
When compared with the volume of performances on the keyboard, the
volume of Wave files recorded on the stage piano is extremely low;
accordingly, the playback level is automatically increased for Wave files with
} and { characters in the positions indicated in order to maintain a good
balance between keyboard and playback levels.