


7 CP5/CP50 Reference Manual
Internal Design of the CP5 & CP50 > Tone Generator
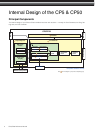
TRACK Part
Each CP5 or CP50 Performance can also contain a backing track for playing back as an accompaniment to your key-
board performances. Three different types of backing track can be selected — namely, Preset Drum Patterns, User
Songs, and Wave files. Whenever you select a Preset Drum Pattern or a Wave file located on a USB flash-memory
device, the TRACK part can be used to set its volume, pan, and reverb send level. For more details on these parameters,
see TRACK Part (page 39) from the Reference section below.
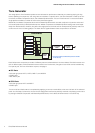
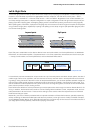
MIC INPUT Part (CP5 only)
With the CP5, a microphone can be plugged into the MIC INPUT connector so that you can conveniently sing along as
you play. Each CP5 Performance features a MIC INPUT part that can be used to adjust the volume, pan, and effect set-
tings for the audio input via this connector. Furthermore, this audio can also be processed using a noise gate, compres-
sor, equalizer, and insertion effect. For more details, see MIC INPUT Part (page 40) from the Reference section below.
Reverb Block
The Reverb block on your CP5 or CP50 provides a host of exquisite reverb algorithms originally developed by Yamaha
for use in professional-audio applications. This block allows a common reverb effect to be applied to all parts from the
current Performance, and each features a number of freely configurable parameters. For details on the types of reverb
effect available for use and the corresponding parameters, see Reverb (page 42) from the Reference section below.
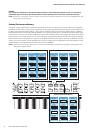
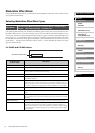
Makeup of Performance Memories
Your CP5 or CP50 can store Performances in three main memory areas — namely, the Preset Performance memory, the
User Performance memory, and an External Performance memory. The specific roles of each of these memory areas are
described below.
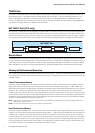
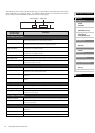
Preset Performance Memory
Accessed using the [PRE] button, the Preset Performance memory is used to hold the Performance presets that come
ready-made with your CP5 or CP50. This memory area contains three individual memory banks — PRE1, PRE2, and
PRE3. Each time you press the [PRE] button, a different Preset Performance memory bank will be selected. Four memory
groups (A, B, C, and D) are contained within each memory bank, and each one of these groups can hold ten Perfor-
mances. Press one of the group buttons [A] to [D] followed by one of the number buttons [1] to [10] to choose the corre-
sponding Performance from the currently selected External Performance memory bank. In order that they will always be
available for use, Preset Performances cannot be overwritten with other Performances that you have modified or created.
As such, the Preset Performance memory is read-only.
NOTE Performance 1 from Group A within the PRE1 memory bank will always be selected when you press the [PRE] button while
holding down the [EXIT] button.
NOTE For a list of all Preset Performances, see the Data List pdf document.
User Performance Memory
Accessed using the [USER] button, the User Performance memory is used to store original Performances that you have
created. This memory area contains three individual memory banks — USR1, USR2, and USR3. Each time you press the
[USER] button, a different User Performance memory bank will be selected. Four memory groups (A, B, C, and D) are
contained within each memory bank, and each one of these groups can hold ten Performances. Press one of the group
buttons [A] to [D] followed by one of the number buttons [1] to [10] to choose the corresponding Performance from the
currently selected User Performance memory bank. In the stage piano's default condition, the User Performance mem-
ory contains exactly the same content as the Preset Performance memory.
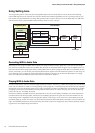
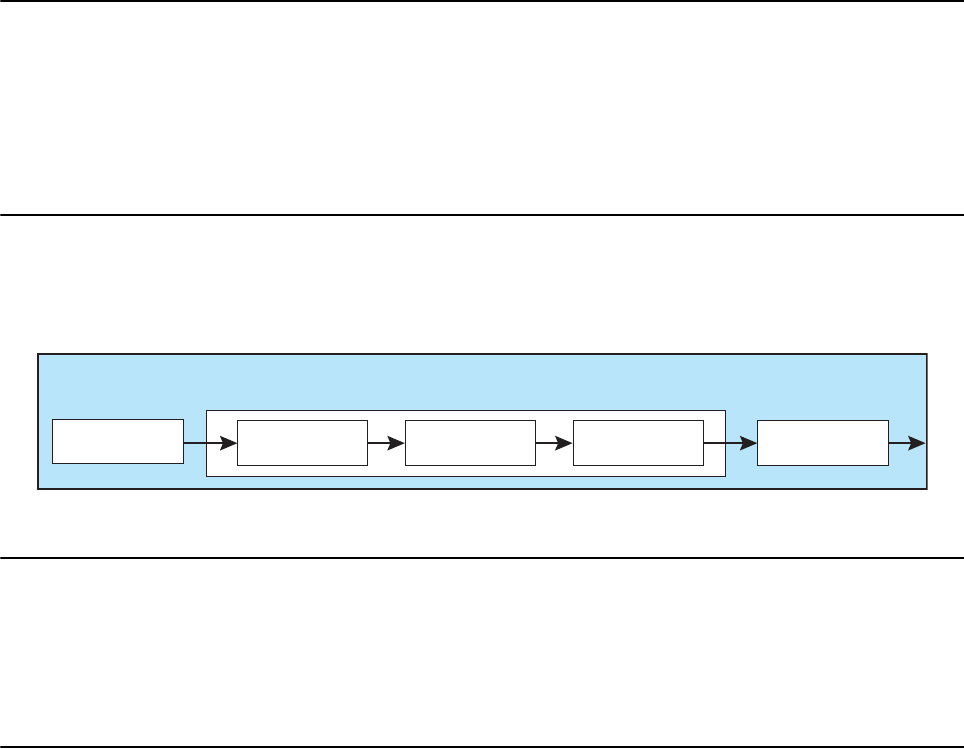
MIC INPUT Part
MIC INPUT Insertion EffectNoise Gate Compressor EQ