


preset voices, you can do so without "losing" this
voice. There are two approaches to this.
(A) You can store this voice in its current state on
a RAM cartridge by following the instructions on
page 49, or...
(B) You can press the [MEMORY SELECT-IN-
TERNAL] or [MEMORY SELECT-CARTRIDGE]
button and then play any preset voices you like.
Later, even if you've turned power off and then on
again, you can return to this voice by doing the
following; press [FUNCTION], the [EDIT RE-
CALL], then [YES] [YES].
Additional editing features: ALGORITHM SE-
LECT, KEYBOARD RATE SCALING, and KEY-
BOARD LEVEL SCALING
At this point you have programmed Operators 1 and
2, which serve respectively as a carrier and modulator
(as arranged in Algorithm 1), so the frequency modula-
tion creates a woodwind-like character. You have also
modified the initialized "square" envelopes to more
closely resemble a woodwind instrument. We have not
yet created a particularly realistic or even pleasing voice,
but that's not the object for now. We are more concerned
with showing you how the DX7 may be programmed.
Some of the settings we suggest are calculated to most
clearly present concepts to you, not to produce the
"best" voice. This will continue to be the case as we go
on to show you a number of ways to refine the voice.
We ask that you continue to use the settings we rec-
ommend. Otherwise, future instructions may not make
any sense — sometimes a slight difference in one setting
will cause another setting to have no effect or far too
much effect. After you've learned how the instrument
works, you'll be able to program voices that are pleasing
to you.
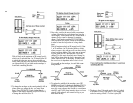
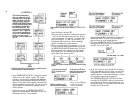
NOTE These instructions assume you have followed
the instructions in the previous section, and that the
DX7 is in the EDIT mode. Before you go on, the dis-
play should appear as shown here, and Operators 1
and 2 should be programmed as indicated in the
chart.
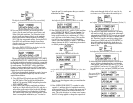
If Operators 3 through 6 are ON (display 111111), turn
them off for now (display 110000)
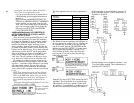
Operator 1 should be
the current operator,
as shown here
This parameter doesn't matter for now because you're
about to select another one anyway
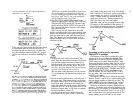
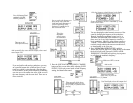
This chart represents what you have programmed so
far:
EDIT mode
PARAMETER
OUTPUT LEVEL
FREQUENCY RATIO
EG RATE 1
EG RATE 2
EG RATE 3
EG RATE 4
EG LEVEL 1
EG LEVEL 2
EG LEVEL 3
EG LEVEL 4
OPERATOR
1
99
0.50
43
99
99
50
99
99
99
0
2
69
2.00
43
99
99
50
99
99
99
0
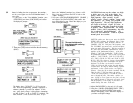
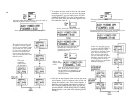
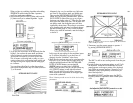
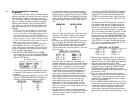
1. The difference between algorithms is the difference in
the way operators are arranged. Let's try switching the
two operators that are turned on and see what hap-
pens to the sound. Press the [ALGORITHM] button
and then press the DATA ENTRY [ +1] button repeat-
edly to step through algorithms 1 through 32 (or
move the slider up slowly). Play a few notes each
time you press [>] so you can hear how each algo-
rithm affects the sound.
To move from algorithm 1 through
algorithm 32. Be sure to play and
listen to each one.
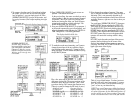
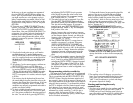
Surprised? You can get JUST TWO sounds from the 32
algorithms! This is predictable if you look at the algo-
rithm diagrams; in all cases, operator 2 either feeds
into operator 1 (is modulating it) or is adjacent to it (so
the sine waves add instead of causing FM synthesis).
In these fragments of several algorithms, operator 2 is
always modulating operator 1. This is characteristic of
Algorithms 1-19 and 28:
In these fragments of two algorithms, operators 1 and
2 are always adding together. This is characteristic of
algorithms 20-27 and 29-32:
38