


or [MEMORY SELECT-CARTRIDGE] and then
pressing the appropriate VOICE SELECTOR (1-32).
4. The voice you just selected on the Master is now
located in the edit buffer within the Slave. To save it,
press and hold the Slave's [STORE] button, and then
press the Slave's voice selector corresponding to the
memory number you wish to use (1-32). The voice is
now stored in that internal or cartridge memory
5. Turn the memory protection back ON unless you plan
to transmit additional voices.
Using
DX7
RAM
cartridges
to
save
DX9
voices
MIDI makes it possible to take voices from the DX9,
transmit by MIDI to the DX7, and store them on the
DX7 RAM cartridge instead of on the DX9 tape. While the
RAM storage is more expensive than the tape, the car-
tridgcs are sometimes more convenient in live perform-
ance situations — or if one's tape recorder fails. This
type of alternate storage can be done in the other direc-
tion, storing DX7 programmed voices on DX9 cassette.
You might wish to do this to save money or if you tem-
porarily run out of cartridge space. It is true that the DX9
tape storage cannot save some of the touch sensitivity
parameters, and that the DX7's 6 operators will be trun-
cated to 4, but in some cases the loss of 2 operators will
not significantly alter the voice so you may wish to try
this technique.
When going from a DX9 to a DX7, the key level scal-
ing will always be set to the exponential curve, with a
value corresponding to whatever scaling value had been
set the DX9. You may wish to reprogram the voice to
have a linear curve after you transmit it to the DX7.
Programming remotely with MIDI
As already stated, you can remotely control FUNC-
TION mode parameters by setting both instruments to
"MIDI CH 1" and setting them to "SYS INFO AVAIL". You
can also remotely control EDIT mode parameters.
1. Turn OFF the memory protection on the Slave by
pressing the [MEMORY PROTECT] button corre-
sponding to the memory area you wish to use
(INTERNAL or CARTRIDGE), and then pressing the
[OFF] button. If you're using a RAM cartridge, be
sure to turn OFF its hardware memory protect switch,
too.
2. Select a voice on the Master that you wish to use as a
starting point for editing. You can, if you wish, select
the same or a different voice on the Slave. If you plan
to create a voice "from scratch" then it doesn't matter
what voice is selected on the Slave. However, you can
program some parameters on the Master which will
then automatically be transmitted to the slave, while
other aspects of the Slave's selected voice will remain
as they were. In this way, components of two (or
more) different voices can be merged.
3. Press [EDIT/COMPARE] on the Master.
4. You can now transmit an operator's envelope, fre-
quency ratio, or any EDIT mode information from 1
voice on the Master and apply it to another voice on
the Slave. As soon as you select or alter any EDIT
parameter on the Master, that value change is auto-
matically transmitted to the Edit buffer of the Slave.
5. During this process, you can still play the Master key-
board and listen to either the Master or the Slave by
selectively adjusting their VOLUME controls (which
are not MIDI interconnected) or by using Volume foot
controls, or by playing the Slave keyboard to hear just
that instrument.
6. When you wish to store the voice on the Slave, press
its [STORE] button and hold it while pressing the
appropriately numbered VOICE SELECTOR (1-32).
MIDI DOES NOT PERMIT YOU TO PRESS THE MAS-
TERS [STORE] BUTTON AND STORE A VOICE 0N
THE SLAVE. YOU HAVE TO PRESS THE SLAVE'S
[STORE] BUTTON.
7. Turn the memory protection back ON.
Escaping from
MIDI
control
You can "turn off" MIDI in any of several ways. The
most immediate way is to unplug the cable, although
this is not always convenient, and can prematurely wear
out the connectors if you do it often. You can also enter
the FUNCTION mode on the Master or the Slave and
press the [MIDI] button (
#
8) and either change one
instrument to a different channel (press [ +1] when the
display shows "FUNCTION CONTROL. MIDI CH= 1). If
you just want to play remotely but not program
remotely set it so that system information is not availa-
ble (press [NO] when the display shows "FUNCTION
CONTROL, SYSTEM INFO AVAILABLE").
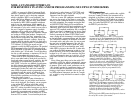
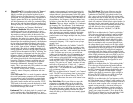
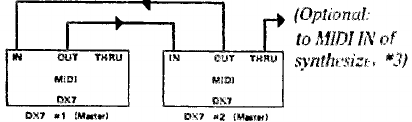
A special setup with two Masters and
no Slave
If you are playing on stage and you wish to be able to
play two DX synthesizers simultaneously, you could use
the first connection shown, with one Master and one
Slave. However, you might wish to stack each DX atop
different keyboards, so it might be more convenient to
use one DX as the Master for part of your performance,
and the other DX as the Master for another part of your
performance. This can be done by using a second MIDI
cable as shown here. Then, by setting both synthesizers
to
"MIDI
CH=
1",
you can
use
either synthesizer
as
the
Master. DO NOT USE THE THRU connector in this type
of setup unless you also want to control an additional
DX from either of the first two.
Special MIDI setup with two DX7s. You play and/or
program voices for both instruments from either one. If
you use the THRU connector of either synthesizer to
feed the MIDI IN connector of a third synthesizer then
either
of
these
Masters
will
control all
three instrumnets.
More
information on
MIDI
MIDI opens up an exciting new world to synthesists.
Because MIDI is relatively new, its full potential has yet
to be explored. Certainly, the DX7 is capable of more
MIDI operations than have been outlined in this text.
In addition, there is already a "MIDI users' group" to
share MIDI information. At the time this manual was
prepared, information was available from: IMA (Interna-
tional Midi Association), 8426 Vine Valley Drive, Sun
Valley, CA 91352, USA. Phone (213) 768-7448.
57