


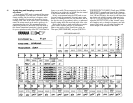

MIDI: A STANDARD INTERFACE
FOR REMOTELY PLAYING AND/OR PROGRAMMING MULTIPLE SYNTHESIZERS
MIDI is an acronym for Musical Instrument Digital
Interface, a specification which several manufacturers
have already agreed to use for designing equipment
which is compatible. MIDI is a non-proprietary "lan-
guage" which allows different (or identical) synthesizers
to "talk" to each other. There are many, many parame-
ters described by MIDI. MIDI-compatible instruments
made by any one manufacturer should generally be
capable of causing other manufacturers' MIDI compati-
ble instruments to play and to switch from one voice to
the next. Computer or sequencer control of multiple
synthesizers will be possible using MIDI, and many
independent computer software and hardware concerns
are working on MIDI related products. Computers will
also be able to provide "hard copy" manuscript of an
improvisation or composition, and permit video synthe-
sis to be integrated with music synthesis. Almost any
computer should be suitable, provided it is fitted with a
special hardware interface capable of communicating at
31.25 kilobaud (31,250 bits per second), and pro-
grammed to satisfy the MIDI specifications. The standard
MIDI interconnect utilizes 5-pin DIN male plugs (Swit-
chcraft 05GM5M or equivalent) on twisted-pair shielded
cable (shield to pin 2 of both ends). To avoid data distor-
tion due to cable capacitance, a maximum of 50 feet (15
meters) of interconnect cable may be used.
Some brands of MIDI-compatible instruments may be
able to cause other brands to bend pitch, tune the key-
board, and perhaps respond to touch sensitivity, but total
compatibility is not nececessarily guaranteed by the
label "MIDI". In fact, the very methods of sound genera-
tion differ between instruments that use MIDI, limiting
the remote programming capability. Within a single
manufacturer's product line, such as the Yamaha DX
series, MIDI can permit extensive programming of one
instrument through the controls of another by com-
municating so-called "system exclusive" information.
When dissimilar synthesizers are fed this type of infor-
mation, they simply ignore it.
Yimaha utilizes extensive system information so,
within the DX series, you can perform most functions
from a single keyboard. For example, you can program
a voice on one DX7 and then transfer that voice to
another DX7. You can transfer part of a voice to the
other DX7, making it possible to merge parts you like in
different voices to create a new voice (this could be done
by manually programming each parameter, but MIDI
makes it faster and easier). You can transfer all 32 voices
from one DX7 to another. You can bend the pitch, tune
the keyboard, or adjust almost any FUNCTION mode
parameter remotely and, of course, you can play one
instrument from the other's keyboard.
With two or more DX synthesizers connected together,
you can use the controls on the Master to control the
Slave(s), yet each synthesizer retains its own sensitivity
and voice assignments. For example, moving the Mas-
ter's MODULATION Wheel to full forward deflection
might cause a slight bit of LFO pitch modulation on that
instrument, while on the Slave there might be a large
amount of LFO amplitude modulation with a completely
different waveform — it depends on how the two instru-
ments' voices and FUNCTION modes are programmed.
Similarly operating the Master's PITCH Wheel would
cause a change in each instrument's voice that depends
on the individually programmed Range and Step values.
This "differential" sensitivity can be helpful as an effect,
for example with a steel guitar voice; you can program
the same voice into both instruments, then play the
Master and use its PITCH Wheel to bend one "string"
(one note) on one DX, but not bend the same "string"
which MIDI is playing on the other DX. In other cases,
you could set the Master to move up in pitch in a con-
tinuous slide until, at full PITCH Wheel deflection, the
keyboard is up 1/5 octave; at the same time, the Slave
could be programmed to move up in pitch by 1/3 step
jumps until it reaches a full octave above the starting
pitch.
Many of these same .things can be done with a DX7
connected to a DX9; the interface automatically compen-
sates for the different algorithms and different numbers
of operators. What's more, several synthesizers can be
"daisy chained" together for simultaneous playing, and
you can switch the voice memories on all of them by
pressing a single button. Individual voices on the vari-
ous MIDI-connected instruments can then be "brought
out" or faded by using individual foot controls to adjust
the volume.
MIDI
connections
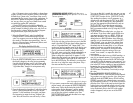
To utilize MIDI, you'll need a suitable cable, available
from your Yamaha DX dealer. One instrument will be
designated as the Master, and the other instruments) as
the Slave(s). The Master is the DX which you primarily
use to play or program the other DX(s). In the simplest
setup, you connect the MIDI OUT jack of the Master to
the MIDI IN jack of the Slave.
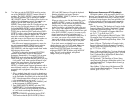
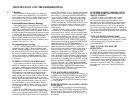
Standard MIDI setup with two DX7s. You play and/or
program voices for both instruments from the Master
(which is the one whose MIDI OUT jack is used You
can also play the Slave directly if you wish.
In this setup, the Master (instrument
#
1) can be used to
play and/or program the first Slave (instrument
#
2)
However, the the second Slave, (instrument
#
3) cannot be
remotely controlled by the Master — the first Slave
(instrument
#
2) can control the second Slave (instru-
ment
#
3). In other words, when MIDI IN/OUT jacks are
used to interconnect several instruments, remote play-
ing or programming is possible only from one instru-
ment to the next along the "chain." As always, each
instrument can be played or programmed locally
In this setup, the Master can be used to play or program
both Slaves. The difference, compared to the previous
setup, is that here the THRU connector of the first Slave
(instrument
#
2) is used to feed IN connector of the sec-
ond Slave. Additional instruments can also be con-
trolled by the Master by feeding from the THRU
connector of one to the IN connector of the next, and so
on.
NOTE One further MIDI connection diagram is shown at
the end of this section of the manual.
55