


CHAPTER 1: Getting Started
16
Continue to next page...
English
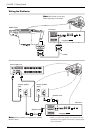
The following functions are available to control the
Disklavier remotely. Set up a variety of useful functions
to your preference.
Tip: Tap on ([PRC-100 Menu] icon) to return to
the [PRC-100 Menu] screen.
[Interface]: Usually utilize this function to control
the Disklavier remotely. The [Main] screen is the top
menu of this function. (→ pg. 12 in “Quick Guide”)
[Interface Updater]*: Updates the [Interface].
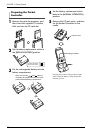
[Piano Assign]*: (→ pg. 18 “Pairing the Pocket
Controller and the Disklavier”)
[Service Center]*: (→ pg. 66 “Diagnosing the
Disklavier”)
[Light & Power]*: Makes energy conserving
settings.
[Recalibrate]: (See “Calibrating the Touch Screen”
below.)
[Date/Time]: (See “Setting up the Current Date and
Time” below.)
[Network]*: Lists available network services.
[System Info]*: Shows system information
(memory, storage, version).
* For normal use, modification of these setups are not
required.
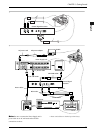
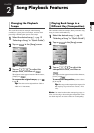
Initial Settings of the Pocket
Controller
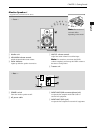
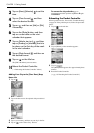
[PRC-100 Menu] screen
[PRC-100 Menu] icon
Task Bar (→ pg. 19)
Title Bar
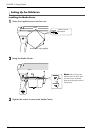
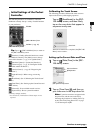
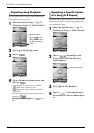
Calibrating the Touch Screen
The following procedure calibrates the touch screen to
improve the accuracy of the tapping operation.
Setting up the Current Date and Time
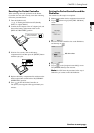
Tap on [Recalibrate] in the [PRC-
100 Menu] screen, and then firmly
tap on the cross hairs that appear in
sequence one by one.
When the recalibration is completed, the [PRC-100
Menu] screen resumes.
1
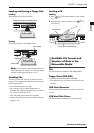
Tap on [Date/Time] in the [PRC-
100 Menu] screen.
2
Tap on [Time Zone] , and then on
your time zone in the drop down list.
Note: If your time zone does not appear in the
drop down list, add the zone to the list by
following the procedure in “Adding Your City
to the [Time Zone] Drop Down List” on page
17, and then repeat step 2.
Cross hair
[Set System Time] screen
[Date] button
City time button