


60
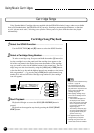
Using Music Cartridges
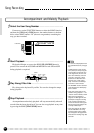
The PSR-620 features a cartridge slot which accepts pre-programmed
Yamaha Music Cartridges containing style, song and/or registration
data. One sample Music Cartridge is supplied with the PSR-620. Others
are available from your Yamaha dealer.
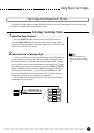
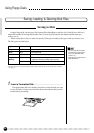
ACCOMP TRACK SONG TRACK
YESTERDY
TEMPO TRANSPOSE MEASURE REPEAT CHORD
BEAT
TOUCHMINUS ONE
REVERB DUAL
CHORUS HARMONY
DSP SUSTAIN
RHYTHM BASS CHORD PAD PHRASEACCOMP MELODY
2
MELODY
1
111
ON /
OFF
VOICE
VOL
REGIST
REC REC REC
OTS
801
135102117130 1011011
118 10 a01
VOICE
STYLE
SONG
REGIST MEMORY
MULTI PAD
DUAL VOICE
SPLIT VOICE
HARM
/
ECHO
OVERALL
DIGITAL EFFECT
NORMAL
SPLIT
SINGLE
FINGERED
LOAD
SAVE
DELETE
FORMAT
• Be sure to insert the applicable Music Cartridge when you recall
the registration settings based on the cartridge data or playback
the song based on the cartridge data. Otherwise, “No Cart (Car-
tridge)” or “WrongCrt (Cartridge)” will appear on the display.
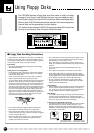
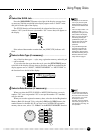
■ Inserting a Music Cartridge
■ Music Cartridge Handling Precautions
• Do not leave Music Cartridges in locations which are
subject to excessive heat or humidity.
• Do not drop Music Cartridges or subject them to
strong shock.
• Do not disassemble Music Cartridges.
• Do not directly touch the Music Cartridge’s electrical
contacts. Persistently touching it may cause to break
electrical contacts or generate static electricity. Static
electric charges can cause loss of data and unreliable
operation.
• Do not insert objects or cartridges other than Yamaha
Music Cartridges in the PortaTone cartridge slot.
Doing so can result in serious damage to the instru-
ment.
• Never attempt to insert or remove a cartridge when
the power switch is ON. Doing so can result in loss
of the PSR-620 memory data or complete lack of
control.
• The Music Cartridge data may not be selected or
played back correctly, if the electrical contacts on the
Music Cartridge are affected with dust. If this hap-
pens, insert and remove the Music Cartridge several
times. This may solve the problem. If the problem
still happens, wipe and clean the electrical contacts
on the Music Cartridge with a dry soft cloth.
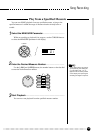
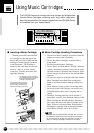
With the power OFF, insert the Mu-
sic Cartridge into the cartridge slot as
shown, and press down firmly until the
Cartridge is seated properly (as shown
in the illustration). The Cartridge is
shaped so that it will only fit in the slot
one way - don’t try to force it in the
wrong way. Turn the power back ON
again after inserting.
For Cartridges without the mark,
the bottom of the serrated edges
of the Cartridge should be even
with the panel edge (not above it).
The triangular mark on the front of
the Cartridge should be completely
below the panel edge when the
Cartridge is properly seated.