


19
marking area to identify Channels.
Use only non-permanent marking devices on the label surface to avoid
permanently marring the surface. Do not use permanent marker to
write on the label surface.
Powering Up
As when powering up any audio gear, it’s best to turn on all system
components in the safest possible order to minimize the risk of damage
to system components and your hearing. Start by turning on devices
such as mic preamps, mixers, keyboards, and effects processors.
Follow this by turning on power amps, or anything that applies power
to speakers, headphones, etc.
In the case of the Personal Monitor Mixing System, you should power
up your main audio mixer, effects devices, and keyboards first. Follow
this by powering up your A-Net input module and then all connected
Personal Mixers.
Lastly, turn on any power amps, powered monitor speakers, in-ear
monitors, etc. that are part of the monitor system.
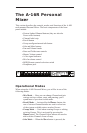
Basic Navigation
When the system is powered up, Preset 1 is automatically selected. On
the Personal Mixer, one Channel is always selected for editing. You
can tell that a Channel is selected because the upper LED in its button
is lit.
Each of the sixteen Channel buttons have two LEDs, an upper and a
lower. The red upper LED indicates that the Channel is selected; you
can change its volume and panning. You can also solo or mute the
channel using the dedicated SOLO and MUTE buttons on the Personal
Mixer front panel (or A-16CS).
The upper LEDs will also light in combination if a Channel is stereo
linked or is part of one of the three available Groups. (More info on
Groups appears later in this quick startup section.)
The lower yellow LED in each Channel button indicates the Channel’s
mute status. A lit yellow LED indicates that the Channel is muted. Any
number of Channels can be muted.
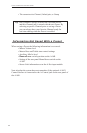
Preparing to Make a Mix
Set the global tone controls—BASS and TREBLE—to the 12 o’clock
position. This is the default EQ setting; no boost or cut is applied to the