


Operation
8
OSC2 (Oscillator 2)
1. Use the “Waveform” to select the waveform of
oscillator 2.
You can choose one of four different waveforms. The most
common way to use this is to select the same waveform as
oscillator 1, and change its pitch slightly to create a rich
sound.
2. Use the “OSC Mod” to select the modulation type for
oscillator 2.
You can choose one of three modulation types.
3. Use the “Semitone” to adjust the pitch of oscillator 2 in
semitone steps.
Some of the more common ways to set this parameter is to
lower the pitch by one octave (–12) or two octaves (–24)
relative to the pitch of oscillator 1. Vintage analog
synthesizer players would sometimes set the oscillators a
fourth (+5) or fifth (+7) apart in pitch.
4. Use the “Tune” to adjust the pitch of oscillator 2.
You can produce a richer sound by slightly changing the
pitch to create a detuned effect.
Mixer
The mixer lets you adjust the output level of each oscillator.
This setting will determine the input level to the filters.
1. Use the “OSC1 Level” to adjust the volume of oscillator
1.
2. Use the “OSC2 Level” to adjust the volume of oscillator
2.
3. Use the “Noise Level”to adjust the volume of the noise
generator.
You can use the noise generator to simulate the breath noise
of a wind or brass instrument, or to create sound effects.
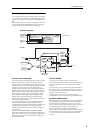
The oscillator waveform you select here can be processed by
the filters, drive/waveshaping, EG, and LFO etc. to create
the sound you want.
Filter
The filters allows you to diminish or emphasize specified
frequency areas of the sound. The tone of the sound will
depend significantly on the filter settings.
RADIAS programs provide the three basic filter types low
pass filter, high pass filter, and band pass filter, as well as
intermediate types that interpolate between the characters
of adjacent filters.
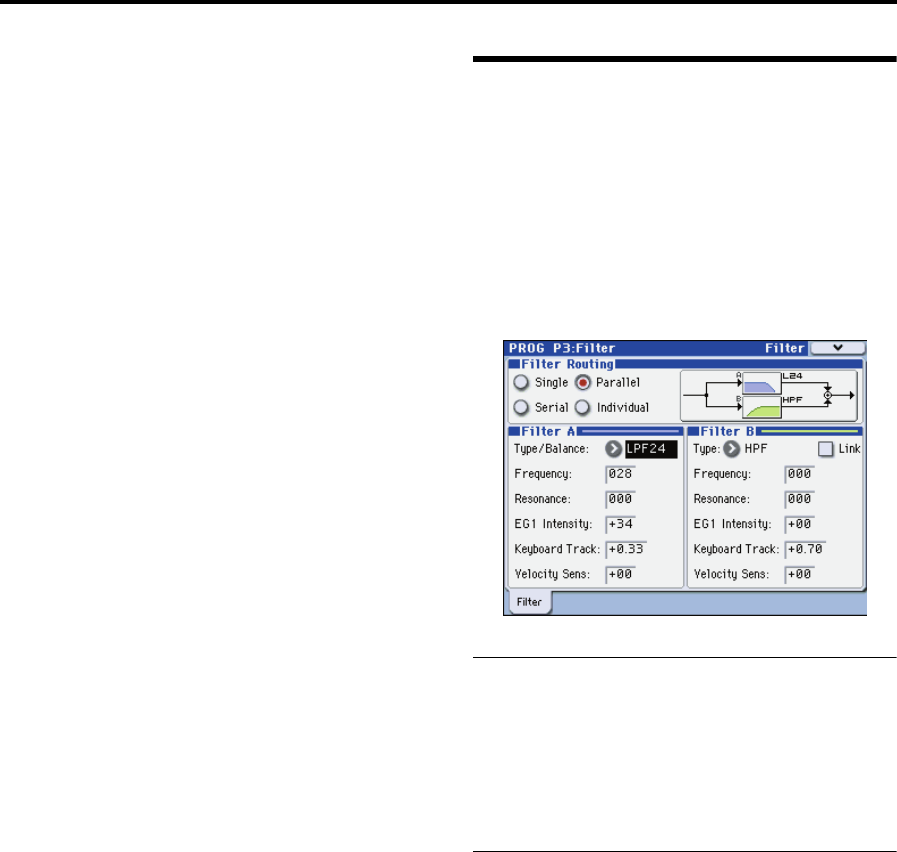
The basic filter settings, including the filter routing, filter
type, cutoff frequency, and resonance, are set on the PROG
P3: Filter page.
Filter Routing
1. Use “Filter Routing” to select the filter routing.
RADIAS programs provide two filters (filter A and filter B).
You can choose to use one or both filters, and how the two
will be connected if both are used.
For more information, please see “Filter Routing” on
page 34.
Filter A, Filter B (Filter settings)
1. Use the “Type/Balance” select the type of filter.
You can adjust the knob to obtain intermediate characters
between these filter types. The filter type will have a major
effect on the character of the sound.
If Filter Routing is Serial, Parallel, or Individual, you can
adjust this independently for filters A and B.
For more information, please see “3–1: Filter” on page 34.
2. Use the “Frequency” to adjust the cutoff frequency of
filter.
Higher settings will make the sound brighter. The result will
depend on the filter type.
For more information, please see “Frequency (Cutoff
Frequency)” on page 35.
3. Use the “Resonance” to adjust the resonance of filter 1.
Higher settings will increasingly emphasize the region
around the cutoff frequency, producing a nasal tone or a
whistle.
4. Use the “EG1 Intensity” to adjust the depth of the effect
that EG1 will have on the cutoff frequency of filter.
You can adjust this independently for filters A and B.
If you turn the knob toward the right of the center position
(“+” values), the EG will move the filter in the positive
direction (i.e., if the filter type is LPF, the sound will become
brighter).
If you turn the knob toward the left of the center position (“–
” values), the EG will move the filter in the negative