


20
Setting mode
In Setting mode you can edit the scene parameters (controller
assignments and settings) for the padKONTROL’s controllers,
and set the parameters for the Flam and Roll functions.
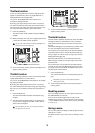
Press the [SETTING/ENTER] key to enter Setting mode. The
[SETTING/ENTER] key will light.
If you want to return to Play mode at this point, press the [SET-
TING/ENTER] key again and the key will go dark.
While you’re making an assignment or choosing a setting, the
[SETTING/ENTER] key will be lit and the display will be blink-
ing. When you then press the [SETTING/ENTER] key, the set-
ting will be applied and you will return to Play mode.
If you decide to cancel the change you made, press the [MES-
SAGE/EXIT] key.
Assigning a Note message to a trigger pad
You can specify the note number, MIDI transmit channel, switch
type, and velocity of the note message that will be sent when
you press the trigger pad.
If you want to keep the changes you made, you must save them. If
you turn off the power or switch to a different scene before saving,
your changes will be lost. (p.15 “Saving a scene”)
■ Note Number
1 Press the [NOTE/CC#/LEFT] key.
The [NOTE/CC#/LEFT] key will light, and the display will
indicate the note number.
If a control change is assigned to the trigger pad, the display
will indicate the control change number.
2 Press the trigger pad whose note number you want to
specify.
The trigger pad you selected will light.
3 Use the encoder to specify the note number.
Note Number [C-1...G9] (
... )
4 If you want to set another parameter, skip this step.
If you are done, press the [SETTING/ENTER] key.
The setting will be applied, and you will return to Play mode.
■ MIDI Channel
1 Press the [MIDI CH/RIGHT] key.
The [MIDI CH/RIGHT] key will light, and the display will
indicate the MIDI channel.
2 Press the trigger pad whose MIDI channel you want to
specify.
The selected trigger pad will light.
3 Use the encoder to specify the MIDI channel.
MIDI Channel [1...16]
The note message will be transmitted on the MIDI chan-
nel you specified.
Disable (
)
No MIDI message will be transmitted.
4 If you want to set another parameter, skip this step.
If you are done, press the [SETTING/ENTER] key.
The setting will be applied, and you will return to Play mode.
■ Switch Type
1 Press the [SW TYPE/POLARITY] key.
The [SW TYPE/POLARITY] key will light, and the display
will indicate the switch type.
2 Press the trigger pad whose switch type you want to
specify.
The selected trigger pad will light.
3 Use the encoder to specify the switch type.
Momentary (
)
A Note-on message will be sent when you press the trig-
ger pad, and a Note-off message will be sent when you
release it.
Toggle (
)
A Note-on message or a Note-off message will be sent
alternately when you press the trigger pad.
4 If you want to set another parameter, skip this step.
If you are done, press the [SETTING/ENTER] key.
The setting will be applied, and you will return to Play mode.
■ Release Value
This parameter is not available when a Note Number is as-
signed to this controller. If you press the [REL. VAL./LOWER]
key, the display will indicate “ ”.
If the trigger pad is assigned to a control change, the display will
indicate the release value (control change value).
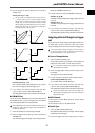
■ Velocity Curve / Velocity Level
You can change the response of each trigger pad by choosing
one of seven velocity curves, or you can chose for a specific
velocity level to be sent, regardless of how hard the trigger
pad is struck.
1 Press the [VELOCITY/UPPER] key.
The [VELOCITY/UPPER] key will light, and the display will
indicate the velocity curve or the constant velocity value.
If a control change is assigned to the trigger pad, the display
will indicate the On value.
2 Press the trigger pad whose velocity you want to specify.
The trigger pad you selected will light, and the display will
indicate the velocity curve or the specific velocity value.