


21
padKONTROL Owner’s Manual
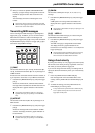
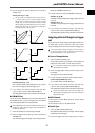
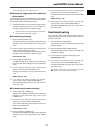
3 Use the encoder to select a velocity curve or specify a
velocity value.
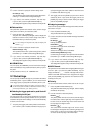
Velocity Curve [C-1...C-8]
You can choose from eight different touch curves: linear (C-
1), smooth curves (C-2, C-3), a curve that does not detect
velocity unless you strike the pad with more than a certain
strength (C-4), a curve that reaches the maximum velocity
without requiring you to strike with great force (C-5), and sev-
eral step-wise curves (C-6, C-7, C-8). Use the curve that pro-
duces the response or effect you want.
Strength
(MIDI Velocity)
ppp
MIN
Velocity
MAX
(127)
fff
(1) (127)
(1)
Strength
(MIDI Velocity)
ppp
MIN
Velocity
MAX
(127)
fff
(1) (127)
(1)
Strength
(MIDI Velocity)
ppp
MIN
Velocity
MAX
(127)
fff
(1) (127)
(1)
Strength
(MIDI Velocity)
ppp
MIN
Velocity
MAX
(127)
fff
(1) (127)
(1)
Strength
(MIDI Velocity)
ppp
MIN
Velocity
MAX
(127)
fff
(1) (127)
(1)
C-4
C-8
C-6
C-7
C-3
C-2
C-1
Strength
(MIDI Velocity)
ppp
MIN
Velocity
MAX
(127)
fff
(1) (127)
(1)
C-5
Constant Velocity [1...127]
The specified velocity value will always be sent regard-
less of how strongly you strike the trigger pad.
4 If you want to set another parameter, skip this step.
If you are done, press the [SETTING/ENTER] key.
The setting will be applied, and you will return to Play mode.
■ USB-MIDI Port
You can choose the USB-MIDI port to which the message will
be transmitted when you press the trigger pad. This applies
only if the padKONTROL is connected via USB.
If the padKONTROL is connected via the MIDI connectors, this Port
setting does nothing. All MIDI messages will be transmitted from
the MIDI OUT connector.
1 Press the [PORT] key. The [PORT] key will light.
2 Press the trigger pad for which you want to choose the
USB-MIDI pot.
The selected trigger pad will light, and the display will in-
dicate the USB-MIDI transmit port.
3 Use the encoder to select the USB-MIDI transmit port.
USB Port A (
)
The MIDI message assigned to the trigger pad will be sent
to port A.
USB Port B ( )
The MIDI message assigned to the trigger pad will be sent
to port B.
4 If you want to set another parameter, skip this step.
If you are done, press the [SETTING/ENTER] key.
The setting will be applied, and you will return to Play mode.
Assigning a Control Change to a trigger
pad
You can specify the control change number, MIDI transmit chan-
nel, switch type, on-value, and release value of the control
change message that is sent when you press the trigger pad.
If you want to keep the changes you made, you must save them. If
you turn off the power or switch to a different scene before saving,
your changes will be lost. (p.15 “Saving a scene”)
■ Control Change Number
1 Press the [NOTE/CC#/LEFT] key.
The [NOTE/CC#/LEFT] key will light, and the display will
indicate the note number or control change number.
If a note message is assigned to the trigger pad, the display
will indicate the note number.
2 Press the trigger pad to which you want to assign a con-
trol change.
The trigger pad you selected will light.
3 Use the encoder to specify the control change number.
Control Change Number [0...127]
(p.115 “MIDI Control Change Messages”)
4 If you want to set another parameter, skip this step.
If you are done, press the [SETTING/ENTER] key.
The setting will be applied, and you will return to Play mode.
In Play mode, trigger pads to which a control change is as-
signed will be lit, and trigger pads to which a note message is
assigned will be dark.
■ MIDI Channel
You can specify on which MIDI channel the control change
message will be sent.
For the procedure, refer to p.20 “MIDI Channel”.
■ Switch Type
1 Press the [SW TYPE/POLARITY] key.
The [SW TYPE/POLARITY] key will light, and the display
will indicate the switch type.
2 Press the trigger pad whose switch type you want to