


22
specify.
The selected trigger pad will light.
3 Use the encoder to specify the switch type.
Momentary (
)
The “on value” will be sent when you press the trigger pad,
and the “release value” will be sent when you release it.
Toggle ( )
The “on value” or the “off value” will be sent alternately
when you press the trigger pad.
4 If you want to set another parameter, skip this step.
If you are done, press the [SETTING/ENTER] key.
The setting will be applied, and you will return to Play mode.
■ On Value
This parameter specifies the On Value (control change value)
that is sent when you press the trigger pad.
1 Press the [VELOCITY/UPPER] key.
The [VELOCITY/UPPER] key will light, and the display will
indicate the On Value (control change value) that is trans-
mitted when you press the trigger pad.
If a note message is assigned to the trigger pad, the display
will indicate the velocity type or velocity value.
2 Press the trigger pad whose On Value you want to specify.
The trigger pad you selected will light.
3 Use the encoder to specify the control change value.
On Value [0...127]
The specified release value (control change value) will be
transmitted. (p.115 “MIDI Control Change Messages”)
4 If you want to set another parameter, skip this step.
If you are done, press the [SETTING/ENTER] key.
The setting will be applied, and you will return to Play mode.
■ Release Value
1 Press the [REL. VAL./LOWER] key.
The [REL. VAL./LOWER] key will light, and the display will
indicate the release value.
If a note message is assigned to the trigger pad, the display
will indicate “ ”.
2 Press the trigger pad whose release value you want to
specify.
The trigger pad you selected will light.
3 Use the encoder to specify the release value.
Release Value [0...127]
The specified release value (control change value) will be
transmitted. (p.115 “MIDI Control Change Messages”)
4 If you want to set another parameter, skip this step.
If you are done, press the [SETTING/ENTER] key.
The setting will be applied, and you will return to Play mode.
■ USB-MIDI Port
You can specify the USB-MIDI port from which the message
will be transmitted (if using a USB connection) when you press
a trigger pad.
For details, refer to p.21 “USB-MIDI Port”.
Assigning the same parameter value
to all of the trigger pads
When specifying the MIDI transmit channel or some other set-
ting, you may wish to assign the same parameter value to all
of the trigger pads at once.
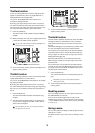
1 Instead of selecting an individual trigger pad, press the
[PROG CHANGE/WRITE/ALL PAD] key.
All the trigger pads will be selected; the [PROG CHANGE/
WRITE/ALL PAD] key and all trigger pads will light.
To cancel this state, select any of the trigger pads.
Assigning a Note message to the pedal
You can specify the note number, MIDI transmit channel, switch
type, and velocity of the note message that is sent when you
press the optional pedal (if connected).
If you want to keep the changes you made, you must save them. If
you turn off the power or switch to a different scene before saving,
your changes will be lost. (p.15 “Saving a scene”)
The padKONTROL automatically determines the polarity of the pedal
when the power is turned on.
1 Press the [PEDAL] key.
The pedal assignment will be selected, and the [PEDAL]
key will light.
■ Note Number
1 Press the [NOTE/CC#/LEFT] key.
The [NOTE/CC#/LEFT] key will light, and the display will
indicate the note number.
If a control change is assigned to the pedal, the display will
indicate the control change number.
2 Use the encoder to specify the note number.
Note Number [C-1...G9] (
... )
3 If you want to set another parameter, skip this step.
If you are done, press the [SETTING/ENTER] key.
The setting will be applied, and you will return to Play mode.
■ MIDI Channel
1 Press the [MIDI CH/RIGHT] key.
The [MIDI CH/RIGHT] key will light, and the display will
indicate the MIDI channel.
2 Use the encoder to specify the MIDI channel.
MIDI Channel [1...16]
The note message will be transmitted on the MIDI chan-
nel you specify.