


26
This parameter is not available when assigning MIDI messages
to the assignable knobs. If you press the [REL. VAL./LOWER]
key, the display will indicate “ ”.
■ Velocity
This parameter is not available when assigning MIDI messages
to the assignable knobs. If you press the [VELOCITY/UPPER]
key, the display will indicate “ ”.
■ USB-MIDI Port
This parameter is not available when assigning MIDI messages
to the assignable knobs. If you press the [PORT] key, the dis-
play will indicate “ ”. Instead, messages will be transmit-
ted using the ports that are assigned to the trigger pads (and
the [PEDAL] key) that have are selected to be affected by as-
signable knobs1/2.
Flam function settings
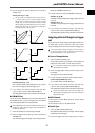
What is the Flam function?
This function simulates the drum playing technique in which
the sticks are held in both hands and used to produce a double
strike on the snare etc. at a slightly different timing.
The X-axis of the X-Y pad specifies the interval of time from
the first strike of the flam to the second strike. The Y-axis speci-
fies the volume for the second strike of the flam. The effective
range of each axis can be set independently.
If you want to keep the changes you made, you must save them. If
you turn off the power or switch to a different scene before saving,
your changes will be lost. (p.15 “Saving a scene”)
■ Selecting the trigger pads and/or pedal that
will be enabled
For each trigger pad, you can independently specify whether
the Flam function will be enabled. You can also specify whether
the Flam function will be enabled for the pedal.
1 Hold down the [FLAM] key, and press each of the trigger
pad and/or [PEDAL] key that you want to use the flam
effect on, making the trigger pads or the [PEDAL] key light.
The Roll function will also be enabled for the trigger pads or
pedal for which the Flam function is enabled.
■ X-axis setting (interval from the first strike to
the second)
1 Press the [NOTE/CC#/LEFT] key.
The [NOTE/CC#/LEFT] key will light, and the display will
indicate the value at the left edge of the X-Y pad (LEFT
value).
2 Use the encoder to specify the value for when the left edge
of the X-Y pad is pressed (LEFT value).
Lower values of this setting will shorten the time until the
second strike. Higher values will lengthen the time.
LEFT Value [0...255]
3 Press the [MIDI CH/RIGHT] key.
The [MIDI CH/RIGHT] key will light, and the display will
indicate the value at the right edge of the X-Y pad (RIGHT
value).
4 Use the encoder to specify the value for when the right
edge of the X-Y pad is pressed (RIGHT value).
Normally you will set this to a larger value than the LEFT
value.
RIGHT Value [0...255]
5 If you want to set another parameter, skip this step.
If you are done, press the [SETTING/ENTER] key.
The [SETTING/ENTER] key will go dark, and you will re-
turn to Play mode.
■ Y-axis setting (velocity of the second strike)
1 Press the [REL. VAL./LOWER] key.
The [REL. VAL./LOWER] key will light, and the display will
indicate the value at the lower edge of the X-Y pad
(LOWER value).
2 Use the encoder to specify the value for when the lower
edge of the X-Y pad is pressed (LOWER value).
Lower values of this setting will decrease the velocity value,
and higher values will increase it.
LOWER Value [1...127]
3 Press the [VELOCITY/UPPER] key.
The [VELOCITY/UPPER] key will light, and the display will
indicate the value at upper edge of the X-Y pad (UPPER
value).
4 Use the encoder to specify the value for when the upper
edge of the X-Y pad is pressed (UPPER value).
Normally you will set this to a larger value than the LOWER
value.
UPPER Value [1...127]
5 If you want to set another parameter, skip this step.
If you are done, press the [SETTING/ENTER] key.
The [SETTING/ENTER] will go dark, and you will return
to Play mode.
Roll function settings
What is the Roll function?
This function simulates the drum playing technique in which a
snare etc. is struck repeatedly at close timing intervals. The X-
axis of the X-Y pad specifies the roll speed. The Y-axis speci-
fies the roll volume. The effective range of each axis can be set
independently.
If you want to keep the changes you made, you must save them. If
you turn off the power or switch to a different scene before saving,