


7
padKONTROL Owner’s Manual
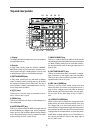
11. [PORT] key
This key is used to specify the USB-MIDI transmission
port that is used by the trigger pads or pedal when the
padKONTROL is connected via USB. (p.28 “About the
padKONTROL and the driver ports”)
12. [KNOB 1 ASSIGN]/[KNOB 2 ASSIGN] keys
These keys are used to assign a specific MIDI mes-
sage to the assignable knobs.
13. Knob 1, Knob 2
Turning these knobs transmits the MIDI message cur-
rently assigned to each knob.
14. [SCENE] key
This key is used for various scene functions such as
saving, recalling, and restoring the preloaded scenes.
15. [MESSAGE/EXIT] key
In Play mode, press this key is used to transmit the
MIDI messages assigned to trigger pads [1] – [8]; Panic,
Note Off, GM on and USER 1–5. You can also press
this key to cancel a setting.
16. [FIXED VELOCITY/PRELOAD] key
This key (when lit) applies a single fixed velocity to all
the trigger pads and the pedal, ignoring the dynamics
and/or preset velocity levels. In Setting Mode, this key
is used to set the fixed velocity value.
This key is also used when restoring the preloaded
scenes into the padKONTROL.
17. [PROG. CHANGE/WRITE/ALL PAD] key
In Play mode, hold down this key and turn the encoder
to transmit program change messages. You can also
press this key to store a scene.
In Setting mode, press this key to assign the same set-
ting to all sixteen trigger pads in one operation - such
as placing all trigger pads on the same MIDI channel.
18. [HOLD] key
When you press this key in Play mode, the point (value)
at which you released your finger from the X-Y pad will
be held.
19. [FLAM] key
In Play mode, turning this key on (lit) will enable the
Flam function. In Setting mode, pressing this key will
allow you to adjust the settings for the Flam function.
20. [ROLL] key
In Play mode, turning this key on (lit) will enable the
Roll function. In Setting mode, pressing this key will al-
low you to adjust the settings for the Roll function.
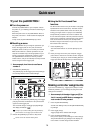
21. Trigger pads
Each time one of the trigger pads is struck, the note
data or control change assigned to that pad will be trans-
mitted. If you’ve assigned note data, the velocity is also
transmitted. These trigger pads are also used to trans-
mit messages, select scenes, or to access shortcuts.
22. X-Y pad
By touching your finger to the X-Y pad, you can trans-
mit the two assigned MIDI messages by touching this
pad with your finger. The messages being sent will de-
pend on the MIDI channel and USB-MIDI transmit port
specified for the trigger pad or pedal.
When the flam or roll feature is on, the X-Y pad con-
trols the flam or roll parameters.
23. USB connector
Use a USB cable to connect the padKONTROL to your
computer so that MIDI messages can be transmitted
and received.
24. MIDI connectors
You can connect external MIDI devices to these con-
nectors. The function of the MIDI connectors will differ
depending on whether the USB connector is connected
to your computer. (p.28 “About the padKONTROL’s MIDI
connectors”)
25. Pedal jack
A momentary pedal such as the Korg PS-1 pedal switch
(each sold separately) can be connected to the pedal
jack. By pressing the connected pedal you can trans-
mit a note number (C-1– G9) or a control change. The
padKONTROL will automatically determine the polar-
ity of the pedal when the power is turned on.
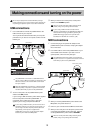
26. Power switch
This switch turns the padKONTROL on by selecting
either DC (Adapter) or USB power. When not in use,
this switch places the padKONTROL in the standby
mode. (p.12 “Making connections and turning on the
power”)
27. Power supply connector
Connect the optional AC adapter here. In most cases,
when the padKONTROL is connected to your computer
via USB, the computer will supply the power (bus
power), so you won’t need the AC adapter.