17
Owner's Manual
Owner's Manual
Control Room Section
The Control Room section is where you defi ne the
source for monitoring in your control room. Typi-
cally, you would use the Speaker 1 and Speaker 2
outputs on the Mix Card for control room monitor-
ing, giving you the choice of near-fi eld and far-fi eld
monitoring through the two stereo line-level speak-
er outputs. This is confi gured in the I/O Confi gura-
tion window (Windows > I/O Confi guration).
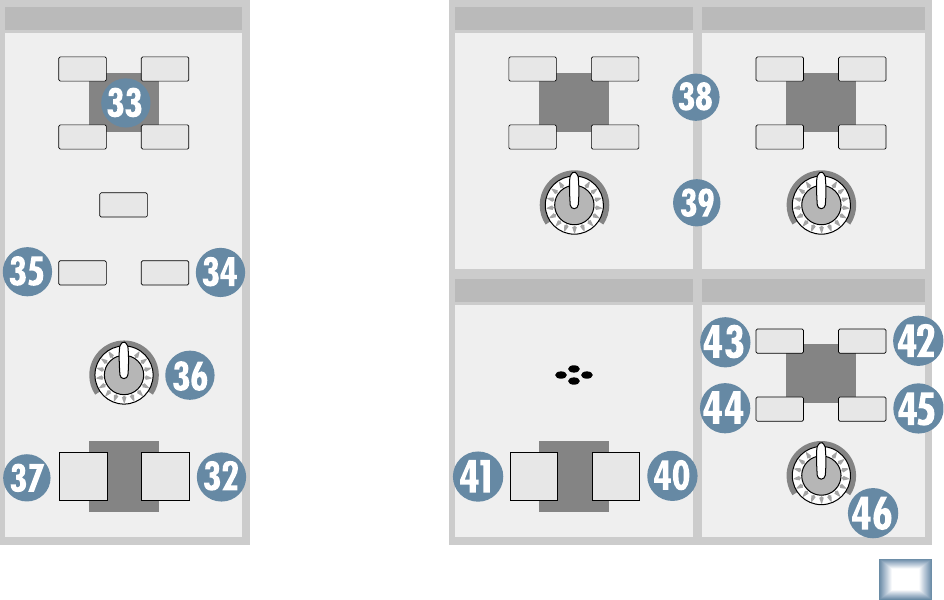
Press the SETUP button [32] in the Control Room
section to open the Control Room Setup window.
• Select the output destination for the surround
sound stems. When you are mixing in surround
sound, you assign the eight bus outputs to the
I/O cards in this window.
• Select the input source for control room moni-
toring. There are four buttons labeled 1, 2,
Surround, and L-R. These correspond to the
buttons on the console labeled 1, 2, SUR, and L-
R [33]. The Custom Input Assigns 1 and 2 drop-
down boxes are used to select virtually any
input source for the left and right control room
outputs. Select Surround to have your surround
sound stems pass through the Control Room
section. This allows you to have individual gain
controls for each stem (at the bottom of the
Control Room Setup window, using the console
V-Pots), and activate the surround calibration,
which sends pink noise to each surround output
to verify that each speaker is set to the same
relative volume.
• Select Near
(Speaker 1) or Main
(Speaker 2) con-
trol room outputs
[34/35].
• Adjust the listen-
ing level of the Near
or Main outputs with
the knob [36] in the
Control Room sec-
tion on the console,
or the Near/Main
control in the Con-
trol Room Setup win-
dow. The DIM button
[37] allows you to
temporarily duck the
control room output
by a preset amount,
which you can set
in the Control Room
Setup window with a
range of off (–∞) to
0 dB.
Phones Section
The Phones section [38] allows you to select the
input source for the headphone outputs (Phones 1 and
2). Typically, you would select the C/R (Control Room)
button for the headphone source, but you can have
two custom sources confi gured in the Phones Setup
window. Press the SETUP button in the Phones 1 or
Phones 2 section to open the Phones Setup window.
• Click Copy Mix To Cue 1 or 2 to copy all the
channel fader settings to Cue Mix 1 (Aux 9-10)
or Cue Mix 2 (Aux 11-12). This is a quick way
to copy the Master L-R mix, including effects,
to the phones output.
• Click the Input Assign drop-down boxes to
select two custom input sources for each head-
phone output.
•
Adjust the headphone listening level with the
knobs [39] in the Phones 1 and Phones 2 sections.
Talkback Section
The Talkback section allows you to communicate
from the console to someone listening over the head-
phones. Press the SETUP button [40] in the Talk-
back section to open the TALKBACK SETUP window.
•
Select the source for the talkback function by
clicking the Source drop-down box. This can
be either the built-in talkback mic in the Talk-
back section, or a microphone connected to an
input card.
CONTROL ROOM
DIM SETUP
1 2
SUR
MONO
L - R
NEAR MAIN
PHONES 2PHONES 1
SOLOTALK BACK
TALK SETUP
1 2
SETUP C/R
1 2
SETUP C/R
AFL
MIX
DOWN
PFL CLEAR


