


53
Owner's Manual
Owner's Manual
Anti-Static Precautions
The Digital X Bus I/O cards come
packaged in an anti-static bag for
protection against electro-static
discharge (ESD). Do not remove the
card from the bag until the exact moment you are
ready to install it. When the time comes to remove
the card from the bag, take great care to hold it by
the rear metal plate only. Never touch the circuit
board, its electronic components, or input/output
connectors. Do this procedure in an area that is not
carpeted.
You are probably getting anxious to install the card,
but count to ten, and read these instructions fi rst.
Installation Procedure
You will need a medium-size slot-head screwdriver.
1. Turn the power off and remove the power cord
and all other cords from your Digital X Bus.
2. Place the Digital X Bus on a fl at horizontal
surface, where you can easily access the rear
panel.
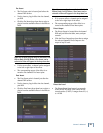
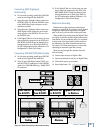
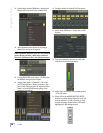
3. Use the screwdriver to undo two screws and
remove any unused plate from card slots A, B,
or C. Keep the plate in a safe place as you may
need it one day.
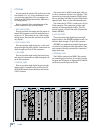
WORD
CLOCK
SYNC CARD
I
N
O
U
T
I
N
O
U
T
SMPTE
A
B
MIX OUT CARD
SPDIF
SPEAKERS
PHONES
MIX OUT
I
N
O
U
T
I
N
L
R
1
2
L
R
L
R
O
U
T
AES/EBU
S
Y
N
C
C
•
S
L
O
T
S
D
•
S
L
O
T
B
•
S
L
O
T
S
A
•
S
L
O
T
S
WORD
CLOCK
SYNC CARD
I
N
O
U
T
I
N
O
U
T
SMPTE
A
B
MIX OUT CARD
SPDIF
SPEAKERS
PHONES
MIX OUT
I
N
O
U
T
I
N
L
R
1
2
L
R
L
R
O
U
T
AES/EBU
S
Y
N
C
C
•
S
L
O
T
S
D
•
S
L
O
T
B
•
S
L
O
T
S
A
•
S
L
O
T
S
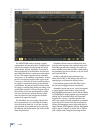
Note: Do not remove or reposition the two cards
that come with your Digital X Bus. The D-slot is
not used on the X.200, and is described in the
Digital X Bus X.400 manual.
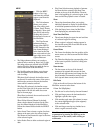
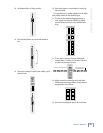
4. Now is the time to install the new card. Move
the bag containing the card close to the Digital
X Bus. Touch your hand against any exposed
metalwork of the Digital X Bus, as this will help
remove any excess static. Without taking any
footsteps, remove the card from its anti-static
bag. Take great care to hold it by the rear metal
plate only. Never touch the circuit board, its
electronic components, or input/output connec-
tors.
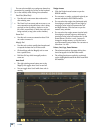
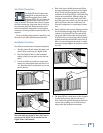
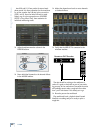
5. Gently slide the card in place, making sure that
the top and bottom edges align with the nylon
runners of the Digital X Bus. The card should
just gently slide in place until the last quarter
of an inch, then you can press gently, but fi rmly
against the metal plate until the card is fully in
place. Do not press against any input or output
connectors. Finger-tighten the screws to secure
the card.
WORD
CLOCK
SYNC CARD
I
N
O
U
T
I
N
O
U
T
SMPTE
A
B
MIX OUT CARD
SPDIF
SPEAKERS
PHONES
MIX OUT
I
N
O
U
T
I
N
L
R
1
2
L
R
L
R
O
U
T
AES/EBU
S
Y
N
C
C
•
S
L
O
T
S
D
•
S
L
O
T
B
•
S
L
O
T
S
A
•
S
L
O
T
S
WORD
CLOCK
SYNC CARD
I
N
O
U
T
I
N
O
U
T
SMPTE
A
B
MIX OUT CARD
SPDIF
SPEAKERS
PHONES
MIX OUT
I
N
O
U
T
I
N
L
R
1
2
LR
L
R
O
U
T
AES/EBU
S
Y
N
C
C
•
S
L
O
T
S
D
•
S
L
O
T
B
•
S
L
O
T
S
A
•
S
L
O
T
S
6. The Digital X Bus is now ready to take its place
in polite audio society, and your job here is
done. Gather 50 good friends and tap-dance out
into the street, taking care to follow all road
safety rules and tap-dance instructions.