43
Owner's Manual
Owner's Manual
LFE (Low-Frequency Effects)
• The LFE feature makes it possible to handle
all your bass management functions right from
the channel panning, rather than purchasing an
external surround bass management box.
• Click the LFE Cutoff ON button to turn on the
LFE channel (subwoofer). When the button is
off, there is no output to the subwoofer channel
(Bus 4) and all the low-frequency information is
routed to the main surround speakers.
• When the LFE Cutoff button is ON (lit), the low-
frequencies are routed to the subwoofer output.
Rotate the LFE Cutoff knob to select the cutoff,
or crossover, frequency for the subwoofer out-
put. It ranges from 20 Hz to 8 kHz.
• Rotate the LFE Level knob to adjust the sub-
woofer level. It ranges from 0 dB (unity gain) to
off (–∞).
Center %
• This controls the amount of center channel
signal going to the center channel output.
• At 0%, all the center channel signal is routed to
the center channel output (Bus 3).
• At 50%, the center channel signal is evenly
distributed among the L, C, and R outputs.
• At 100%, the center channel signal is routed
to the Left and Right outputs (phantom center
channel).
Memory A/B
• Each memory stores the most recent settings
made for the selected channel.
• Click either of these buttons to instantly recall
the stored settings.
• Ideal for making quick A/B comparisons be-
tween settings.
MENU
• Click the MENU button to Cut, Copy, and Paste
the surround settings to and from the clipboard.
• Select Reset to return all surround controls to
their default settings.
MORPH
• Click the MORPH button to smoothly fade from
one memory setting to the other (Memory A and
B).
• The amount of time it takes for this transition
is set in the time window next to the MORPH
button.
• Morph time can be set as low as 0.1 second or
as high as 30 seconds.
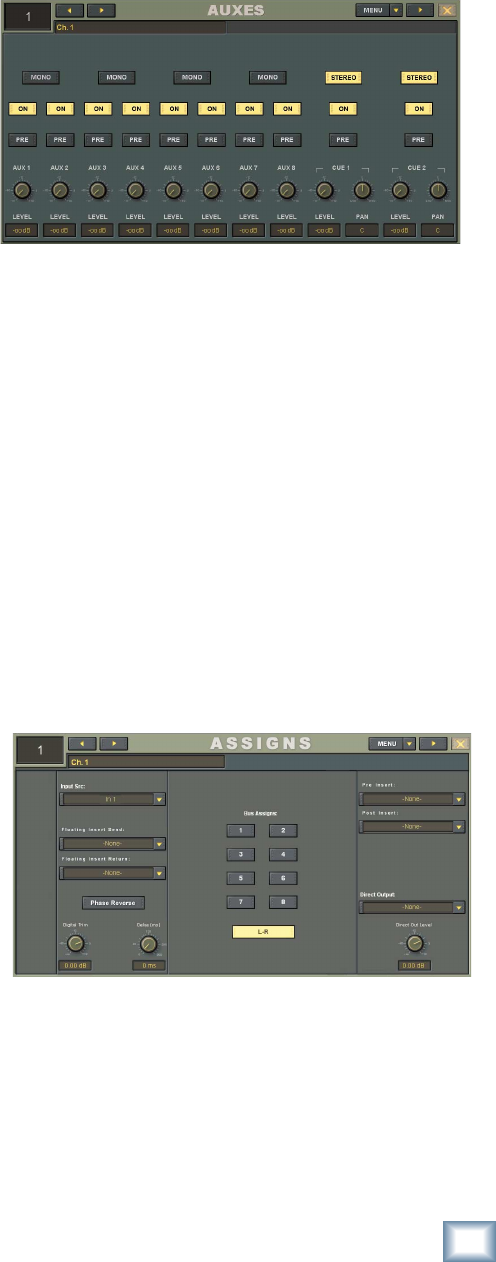
Auxes
The AUXES window allows you to see all the Aux
sends settings for the selected channel.
• You can also open the AUXES window by click-
ing the Aux sends section on a channel strip.
•
Click the ON button to turn individual Aux sends
on and off without changing the gain settings.
• Click the PRE buttons to change the Aux sends
from post-fader to pre-fader.
• Click the MONO/STEREO buttons to toggle
between mono and stereo pairs.
• Click the MENU button to Cut, Copy, and Paste
the Aux send settings to and from the clipboard.
Assigns
The ASSIGNS window is perhaps the most power-
ful feature of the Digital X Bus, for it is here that
you select the input source, multiple insert points,
and outputs for a channel. You will come to appreci-
ate the power and fl exibility of the signal routing
capability of the Digital X Bus.
• You can also open the ASSIGNS window by
touching the assign section on a channel strip.
Input Src
•
Click the Input Src (Source) drop-down box to
select the signal source that is routed to the
input of the selected channel strip. Typically, you
would choose an input from one of the I/O cards
that you have installed. However, you can select
from a number of other sources including another
channel, an aux send, one of the eight buses, the
talkback mic, or one of three built-in oscillators
(oscillator setup is in the Audio Toolbox under
Windows > Tools).


