49
Owner's Manual
Owner's Manual
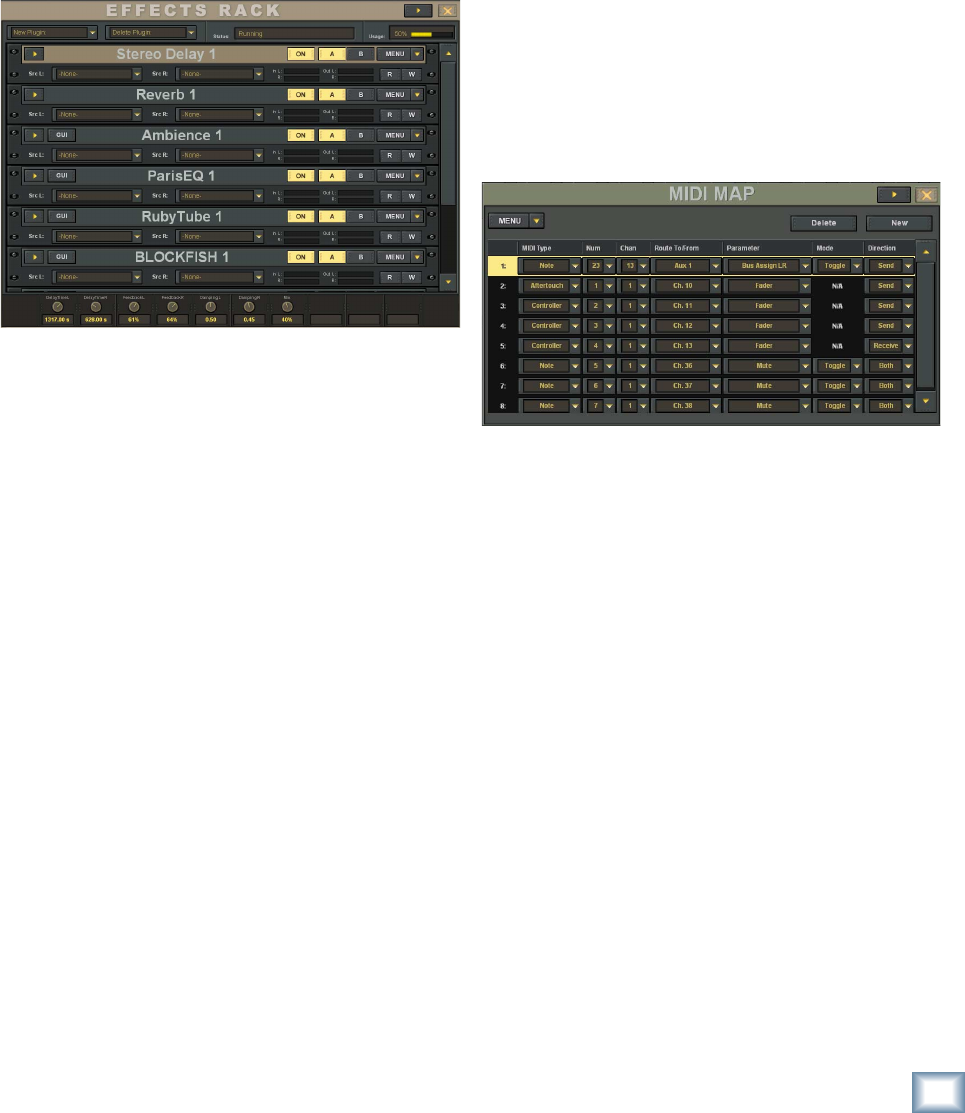
Effects Rack (Ctrl+8)
The EFFECTS RACK window is where you select
the plug-ins you want to use in your session. The
Digital X Bus comes with a variety of plug-ins,
ready to use. In addition, you can install any VST
plug-in, a fi rst for any digital mixing console in this
class.
You can select multiple plug-ins to use as internal
effects processors for inserting into a channel’s pre
or post insert point, or to drive with an Aux send
(and return via an unused channel).
New Plugin
• Click this drop-down box to select a plug-in to
add to the Effects Rack.
• Each plug-in has a drop-down box to select an
input source. If it’s a stereo effect, it has sepa-
rate input source selection boxes for the left
and right inputs.
• Each plug-in has an ON button, Memory A and
B, and a Menu drop-down for cut, copy, paste,
and saving and loading presets.
• Click the right-pointing arrow in the upper left
corner of the plug-in to open the controls for the
particular effect. Some plug-ins have a GUI but-
ton to open a separate window with a custom-
ized user-interface.
• The controls for the selected plug-in also ap-
pear at the bottom of the EFFECTS RACK win-
dow so you can use the corresponding V-Pots to
adjust the parameters.
• You can select a particular plug-in more than
once. For example, if you want to have a reverb
effect on channel 1 and channel 2, select the
Reverb plug-in twice in the New Plugin drop-
down box. They will appear as Reverb 1 and
Reverb 2.
Delete Plugin
• Click this drop-down box to select a plug-in to
remove from the Effects Rack.
• Deleting a plug-in from the Effects Rack auto-
matically removes it from its input source and
output destination.
Running
• Indicates that the system is operating smoothly
with no overloading to the processor.
Usage
• This indicator shows how much of the available
processing power is being used by the plug-ins
loaded into the Effects Rack. The more effects
you load into the Effects Rack, the higher the
usage indicator will go.
MIDI Map (Ctrl+9)
The MIDI Map window offers setup options for
bidirectional MIDI control of practically the entire
console’s parameter set. The MIDI Map provides
complete parameter access to almost all channel
functions, master fader, channel strip, and Aux
master controls, and all plug-in parameters. In addi-
tion, the Master section and Transport controls are
assignable to MIDI messages.
MIDI continuous controller, polyphonic after-
touch, and note on messages are assigned to the
various parameters via the MIDI Map, in a linear
approach of one controller type per parameter. Any
variable controller may be a continuous control mes-
sage or a poly aftertouch message, and any switch
message (on/off assignment switches) can be as-
signed to a note on (or note off as note on of veloc-
ity 0) message.
Messaging may be bidirectional. This means you
can control the console from a sequencer or control
a sequencer from the console. Note that MIDI pro-
gram changes may also be used to trigger Digital X
Bus snapshots. Snapshot program change messages
may occur simultaneously with MIDI Map control
messaging.


