


88
X.200
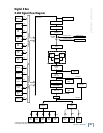
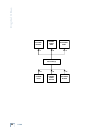
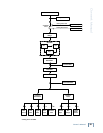
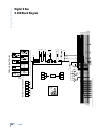
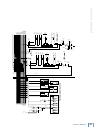
Digital X Bus
Appendix D: Software Installation
Digital X Bus Software Installation Procedure
Windows XP Users
USB Flash/Pen Drive Method (recommended)
***Requires a USB Flash/Pen drive***
1. Download the Software update from www.mackie.com to your local hard drive.
2. Insert a USB Flash Drive into your computer. Make sure that Windows identifi es the Flash Drive as a
“USB Mass Storage Device” in the pop-up balloon message from the System Tray.
3. Right-click on the downloaded fi le and select “Extract All” from the pop-up menu; this will launch the
Windows Compressed Folders Extraction Wizard (say that ten times fast).
4. Click “Next.”
5.
Click “Browse” and point the directory at the root level of the Flash Drive (usually marked with an
“E:/” or an “F:/” designation). Click “OK.”
6. Click “Next” to start the Extraction. Once that is completed, click “Finish.”
7. Remove the Flash Drive from your computer and insert it into one of the available USB ports on your
Digital X Bus.
8. Select “Install Packages” from the File Menu on the Digital X Bus.
9. Select the new Digital X Bus build from the list and select “Run Installer.” Select “OK” when asked to
shut down the Digital X Bus application in order to run the Installer.
10. Once you are back to the main mixer screen, re-select the “Install Packages” from the File Menu.
11. If there is a “System Update” fi le in the list and the Status column reads “Needs Update,” then high-
light the “System Update” fi le and select “Install.” But if the Status column reads “Up to Date,” then
move on to Step #13.
12. Re-boot the console. If it re-boots itself, then move on to Step #13.
13. Select “About” from the Windows menu and verify you are running the same number build you just
downloaded.
CD ROM Method
***Requires a CD burner attached to your PC as well as a USB CD ROM drive attached to the Digital X Bus***
1. Make sure you have a CD Burner and the appropriate software loaded on your computer.
2. Download the Software update from www.mackie.com to your local hard drive.
3. Right-click on the downloaded fi le and select “Extract All” from the pop-up menu. This will launch the
Windows Compressed Folders Extraction Wizard.
4. Click “Next.”
5. Click “Browse” and click on “Desktop” in the folder list. Then click “Make New Folder.”
6. Type in a name for this new folder, such as “Digital X Bus Update” or something obvious.
7. Click on the newly created folder, and then Click “OK.”
8. Click “Next” to start the Extraction. Once that is completed, click “Finish.”