


TASCAM DR-100
11
2–Quick Start Guide
Prepare to record
1 Format the SD card (if necessary).
If a new card or one that has not been formatted
by this unit is installed, the following message
appears.
Press the ENTER/MARK key to start formatting
the card.
NOTE
The included SD card is already formatted, so there is
no need to reformat it.
2 Set the date and time.
This unit uses its internal clock to make a record
of the date and time when a file is recorded.
You can record without making the setting, but
the unit is set to the default value of "
2000/01/01
00:00
". (See “Setting the date and time” on page
21.)
3 Set the recording format
Set the recording mode and sampling frequency.
(See “Preparing with the REC SETTING menu”
on page 25.)
If you skip this step, the unit will record with the
following default values.
Recording mode: WAV 16 bit
Sampling frequency: 44.1 kHz
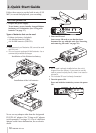
Start and stop recording
Follow these steps to use the built-in mics (UNI
MIC) to record.
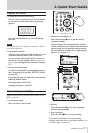
1 Set the input signal.
Move the INPUT switch to UNI.
2 Adjust the recording level.
Press the RECORD [º] key to put the unit in
recording standby.
Adjust the input level using the INPUT volume
control and the MIC GAIN switch until the meters
show as much level as possible without causing
the PEAK indicator to light. (See “Adjusting the
input level” on page 27.)
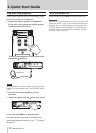
3 Record.
Press the RECORD [º] key to start recording
from recording standby.
4 Stop recording.
Press the STOP [ª] key to stop recording.
For detailed information about recording
methods and convenient recording functions, see
“6–Recording” on page 25.