


TASCAM DR-100
15
3–Names and Functions of Parts
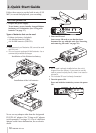
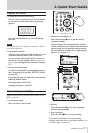
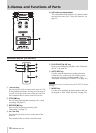
Rear panel
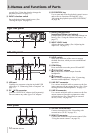
SD card slot cover open.
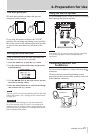
SD card slot cover closed.
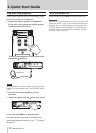
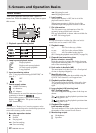
Bottom panel
CAUTION
Do not connect or disconnect mics when the +48V
switch is ON.
.
SPEAKER switch
Set this to ON to output sound from the built-in
speaker. (See “Using the built-in speaker” on page
21.)
NOTE
Even when ON, no sound is output during recording,
in recording standby or when headphones are
connected.
/
Tripod attachment screw-hole (1/4-inch)
Use this to attach the unit to a tripod or mic stand.
CAUTION
Tighten the unit securely to the tripod or mic stand •
to prevent it from falling off.
Place the tripod or mic stand on a level surface •
when using it with this unit.
Some tripods use different types of screws, so it •
might not be possible to attach the unit directly. In
such a case, purchase and use a suitable adapter.
!
Battery compartment cover
n
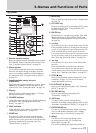
MIC GAIN switch
Set the sensitivity of the mic input. (See “MIC
GAIN” on page 27.)
m
AUTO/LIMITER switch
Set this to ON to activate the limiter or automatic
gain control. (See “Using the auto gain control and
limiter (LEVEL CTRL)” on page 42.)
,
+48V (phantom power) switch
Turn this ON to provide +48 V of power when a
condenser mic is connected. (See “Recording with
external mics (XLR)” on page 26.)
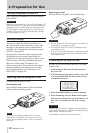
c
Directional stereo mic pair (UNI MIC)
Set the INPUT switch to UNI MIC to make these
electret condenser stereo mics the input source.
v
SD card slot cover
b
SD card slot
Insert the SD card here. (See “Inserting and
removing SD cards” on page 20.)