


TASCAM DR-100
13
3–Names and Functions of Parts
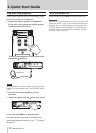
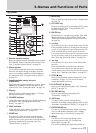
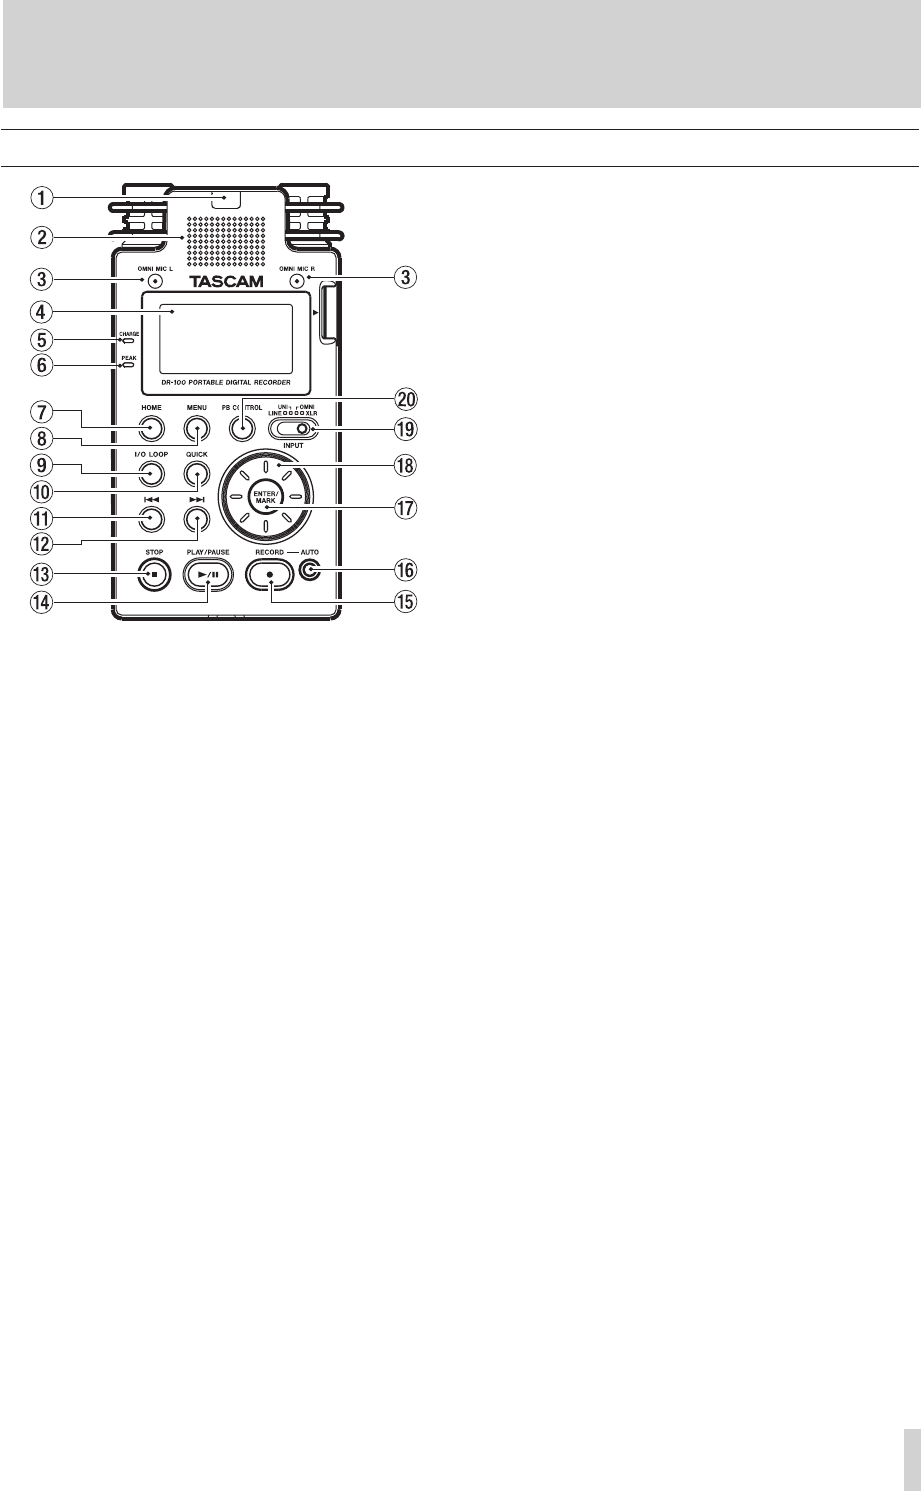
Top panel
1 Remote control receiver
Receives signals from the included remote control
(RC-DR100). When using the remote point it here.
(See “Using the remote control” on page 19.)
2
Mono speaker
Use this built-in speaker to listen to recordings.
Sound is not output during recording, when the
unit is in recording standby or when headphones
are connected. (See “Using the built-in speaker”
on page 21.)
3
Omnidirectional stereo mic pair
(OMNI MIC)
Two built-in mics allow recording in stereo. Select
OMNI using the INPUT switch to set these as the
input source. (See “Setting the input” on page 25.)
4
Display
Shows a variety of information. (See “5–Screens
and Operation Basics” on page 22.)
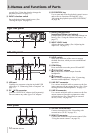
5
CHARGE indicator
Lights when charging and turns off when charging
is complete. (See “Charging the lithium ion
battery” on page 17.)
6
PEAK indicator
Lights when the input volume is too high. (See
“Adjusting the input level” on page 27.)
7
HOME key
Press this key when one of the setting screens
is open to return to the Home Screen. When the
Home Screen is open, press this to switch between
displaying elapsed and remaining time. (See
“Home Screen” on page 22.)
8
MENU key
Press to open the
MENU
Screen. (See “Using menus”
on page 23.)
9
I/O LOOP key
Press to set starting (IN) and ending (OUT) points
for loop playback. (See “Loop playback (I/O
LOOP)” on page 36.)
0
QUICK key
Opens the
QUICK
TAG
and
DELETE
menu. (See “Add
identification tags to files (QUICK TAG)” and
"Delete the selected playback file (QUICK DEL)"
on page 39.)
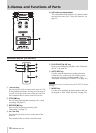
q  key
Press this key briefly to return to the start of a file.
If the playback position is already near the start of
a track, it will skip to the start of the previous file.
Press and hold this to search a track in reverse.
Use it also to move the cursor left on menu screens
as well as to move up a level on the
BROWSE
screen.
(See “Showing files inside folders” on page 38.)
w
¯
key
Press this key briefly to move to the start of the
next file.
Press and hold this to search a track forward.
Use it also to move the cursor right on menu
screens and to move down one level on the
BROWSE
screen. (See “Working with folders” on page 38.)
e
STOP [ª] key
Press to stop playback and recording. (See “Stop
recording” on page 27.) Use it also to cancel
certain operations (select
NO
).
r
PLAY/PAUSE [
Á
/
π
] key
Press to start and pause playback. (See “Playback
(PLAY)” on page 33.)
t
RECORD [
º
] key
Press to start and pause recording. (See
“Recording” on page 27.)
y
AUTO key
Use this to make various settings for the
automatic recording function and to enable it. (See
“Automatic recording (AUTO REC)” on page 29.)
u
ENTER/MARK key
Use this to confirm selections. When recording,
use it to add markers manually. (See “Adding
marks manually to a recording” on page 30.)
i
Wheel
Use this to select items and change values
on setting screens. (See “10–Settings and
Information” on page 40.)
Use it also to change the playback position in