


14
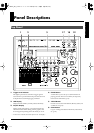
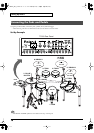
Panel Descriptions
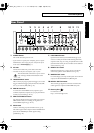
7.
CARD Button
For access to (Compact Flash) memory card functions
such as saving/loading data etc. (p. 70)
8.
SETUP Button
For access to functions that affect the TD-20 globally,
such as MIDI parameters etc. (p. 74)
9.
TRIGGER Button
For access to trigger parameters (p. 44).
10.
EXIT Button
Press this to return to the previous screen. Repeated
pressing takes you back to the “DRUM KIT” screen.
11.
F1–F5 Buttons
These buttons change their function depending on the
contents of the display. The lower part of the display will
indicate the function of each button (p. 23).
12.
SHIFT Button
Used in combination with other buttons. How this
functions is explained in respective parts of this manual.
13.
GROUP FADERS
The faders are switchable, allowing you to adjust the
volume of the kick, snare, toms, hi-hat, cymbals,
percussion and backing instruments, and the click sound
(p. 24).
14.
SEQUENCER
These provide access to and control of sequencer
functions (pattern playback/recording, Percussion set)
etc. (p. 51, p. 61)
15.
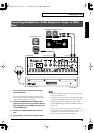
DRUM KIT
These buttons take you to the screens for creating or
editing a drum kit. (p. 31, p. 37, p. 38).
16.
KIT Button
One touch brings you back to the basic display screen. It
works from any Edit mode as well.
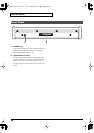
17.
MIX IN Knob
Adjusts the level of the audio source connected to the
MIX IN jack. This sound is output from the MASTER
OUT jacks and/or the PHONES jack. Other possibilities
(p. 78).
18.
PHONES Knob
Adjusts the headphone volume. Plugging in headphones
does not affect the master output (like other audio
device.)
19.
MASTER Knob
Adjusts the volume of the MASTER OUT jacks.
20.
CURSOR Buttons
Used to move the cursor in the display (p. 23).
21.
VALUE Dial
This dial functions like the + and - buttons. Use it to scroll
quickly or make large changes in edited values (p. 23).
22.
TRIG SELECT
Use the lower two buttons to select the trigger number
(pad) you want to access. Press the RIM button to select
the rim of a pad. (RIM button lights.) The PREVIEW
button lets you audition the instrument assigned here, or
you can hit a pad as well to select (p. 24).
23.
PREVIEW Button
This velocity sensitive button allows you to audition an
instrument after you have chosen it with the TRIG
SELECT buttons or after you have played a pad/pedal
(p. 24).
24.
+ Button, - Button
These buttons are used to switch drum kits or to change
values when editing. The + button increases the value,
and the - button decreases it (p. 23). You can also use the
tip of your drum stick to press them. Never hit them with
a stick as this can cause malfunctions.
TD-20_Ref_e.book 14 ページ 2005年5月25日 水曜日 午前9時49分