12
Names of Things and What They Do
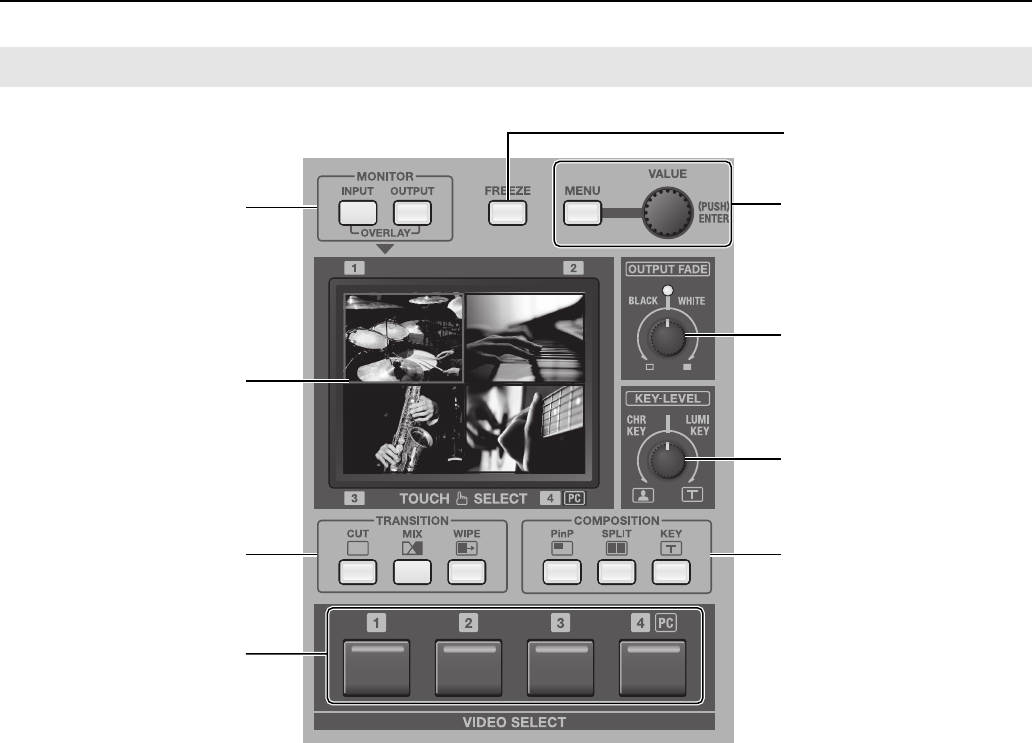
fig.video-mix-section.eps
1. MONITOR Buttons
These switch the view mode for the monitor. Choose a mode
from the followings.
• [INPUT]
This displays the inputs from the respective source devices.
• [OUTPUT]
This displays the result of video mixing on the VR-3 (the final
output).
• OVERLAY
When the [INPUT] button and [OUTPUT] button are pressed
simultaneously, the output picture is overlaid on a four-way split
screen of the input.
2. Monitor
When the view mode is set to [INPUT], you can switch the
video by touching the screen. When the mode is set to
[OUTPUT], you can adjust the position and size of the
Picture-in-Picture (PinP) inset screen. Menus are also
displayed here.
* During two-screen compositing, the background picture can be
switched by touching the screen.
3. TRANSITION Buttons (p. 22)
You can select a transition effect for the video using these
buttons. When switching from one video source to another,
this effect will be applied during the transition.
4. VIDEO SELECT Buttons (p. 23)
You can use these buttons to switch the video instead of the
touch panel.
* During two-screen compositing, use buttons [1] through [4] to
switch the inset screen or foreground picture.
5. FREEZE Button (p. 24)
Use this button to freeze the final output image.
6. MENU Button and VALUE Dial (p. 44)
Use the [MENU] button to call up various menus on the VR-3.
The menus are displayed on the monitor.
The [VALUE] dial is for changing settings. Press the
[VALUE] dial to apply a new setting (ENTER).
* You can change a setting value up or down by ten units at a time
by holding the [VALUE] dial down while you turn it.
7. OUTPUT FADE Dial (p. 24)
Use this when you want to apply a fade-in or fade-out to
final output from the VR-3. Turning the dial
counterclockwise applies a black fade, and turning it
clockwise applies a white fade. Applying a fade makes the
indicator above the dial flash.
Video Select Section
1
2
3
4
5
6
7
8
9


