


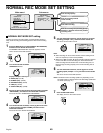


RECORDING AREA SET SETTING
TOTAL CAPACITY display
This shows the total recording capacity of the hard disk. This display
cannot be changed except when the hard disk capacity itself is
changed.
With the initial hard disk setting, the normal recording area takes up
80%, the alarm recording area takes up 19% and the archive area
takes up 1% of the disk capacity. The upper limit is 10 GB (12.5% of
total capacity when using an 80-GB hard disk, 6.25% of total capacity
when using an 160-GB hard disk), so you cannot set a value greater
than this.
The assignment of space to each recording area is displayed as a
percentage of the total. The normal recording area and alarm
recording area together can be set to a maximum of 99% of the total
space.
The archive area cannot be set manually. It is forcibly assigned to a
minimum of 1%. Accordingly, if the normal recording area and the
alarm recording area are set to a total of 85%, the archive area will be
automatically set to 15%.
For example, if the normal recording area is set to 0% and the alarm
recording area is set to 99%, normal recording images will not be
saved onto the hard disk. Only alarm recording images will be saved.
The recording capacity for each recording area should be assigned
according to the requirements of the particular recording location.
If an additional hard disk is added, the increased capacity will be
included in the TOTAL CAPACITY display.
Note:
•
If you change the assignment of space to each recording area of
the hard disk while recording is in progress, the images which have
been recorded up until that point will be erased. This is because
the hard disk itself is initialized during this operation, so be very
careful when making this kind of setting. If you need to change the
sizes of the recording areas for some reason, make sure that you
make a backup copy of the images on some other medium such as
a computer.
•
When the MIRRORING of the HDD SET setting has been set to
“ON”, the TOTAL CAPACITY display of RECORDING AREA SET
shows a smaller value for the hard disk capacity.
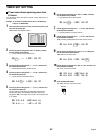
Resetting each recording area
Example: Set the normal recording area to 50% and the alarm
recording area to 49%
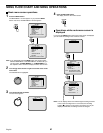
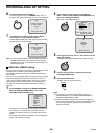
1
Press the MENU button to select RECORDING AREA SET,
and then turn the shuttle dial clockwise.
The RECORDING AREA SET sub-menu appears, and the cursor
moves to NORMAL RECORDING AREA.
2
Use the jog dial to move the cursor to the NORMAL
RECORDING AREA setting, and then turn the shuttle dial
clockwise.
“80%” flashes.
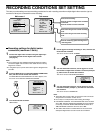
3
Use the jog dial to change the setting, for example from
“ 80%” to “ 50%” , and then turn the shuttle dial clockwise
The cursor moves to ALARM RECORDING AREA.
4
Turn the shuttle dial clockwise.
“35%” flashes.
5
Turn the jog dial to change the setting, for example from 34%
to 49%, and then turn the shuttle dial clockwise.
The cursor moves to AREA FULL RESET.
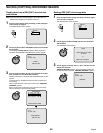
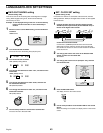
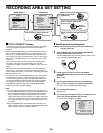
<RECORDING AREA SET>
TOTAL CAPACITY : 80GB
NORMAL RECORDING AREA : 80 %
AREA FULL RESET ->
ALARM RECORDING AREA : 19 %
AREA FULL RESET ->
ARCHIVE AREA : 1 %
AREA FULL RESET ->
CAUTION : WHEN THE AREA SETTING IS CHANGED.
THE WHOLE AREA WILL BE INITIALIZED !
Main menu 1 Sub-menus
<MAIN MENU 1>
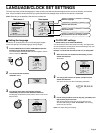
1.LANGUAGE/CLOCK SET ->
2.VIDEO INPUT SET ->
3.RECORDING AREA SET ->
4.RECORDING CONDITIONS SET ->
5.NORMAL REC MODE SET ->
6.TIMER SET ->
7.HOLIDAY SET ->
8.ALARM REC MODE SET ->
TO MAIN MENU 2 ->
MOVE LINES WITH JOG. SELECT WITH SHUTTLE
Displays the total hard
disk capacity.
Sets the capacity of the normal
recording area.
Sets the capacity of the alarm recording
area.
Sets the capacity of the archive area.
Normal
recording
area
Alarm
recording
area
Archive area
MENU
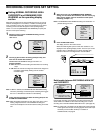
<RECORDING AREA SET>
TOTAL CAPACITY : 80GB
NORMAL RECORDING AREA : 49 %
AREA FULL RESET ->
ALARM RECORDING AREA : 40 %
AREA FULL RESET ->
ARCHIVE AREA : 2 %
AREA FULL RESET ->
CAUTION : WHEN THE AREA SETTING IS CHANGED.
THE WHOLE AREA WILL BE INITIALIZED !
English
45