


Formatting External Disk Drives 159
D24—Owner’s Manual
Formatting Hard Disks for Computer Mounting
This section explains how to format an external hard disk drive so that it can be
mounted by a personal computer. Since the disk drive must first be formatted as a DOS
FAT16 volume on a personal computer, the maximum size of the volume is 2 GB, so
even if you’re using a 4.5 GB hard disk, you’ll only be able to use 2 GB for recording on
the D24.
1 Connect the external hard disk drive to a personal computer and format it as
a DOS FAT16 volume using the MS-DOS “Fdisk” command.
The D24 does not support FAT32 volumes, so be sure to format as FAT16.
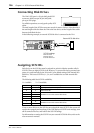
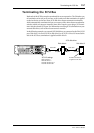
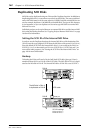
2 Connect the external hard disk drive to the D24.
3 Select the external hard disk drive using the Drive Select function. See “Select-
ing the Work Disk” on page 161.
4 Press the [FORMAT] button.
The FORMAT indicator flashes and “FORMAT DISK—ARE YOU SURE” flashes on
the display.
5 Press the [ENTER] button.
“PRESS—REC + PLAY” appears on the display.
6 Press the [REC] and [PLAY] buttons simultaneously to format the disk, or the
[CANCEL] button to cancel the Format function.
The logical formatting process starts and “FORMATTING” appears on the display.
When formatting is complete, “FINISHED” appears on the display, the FORMAT indi-
cator goes out, and “01 NEW PROJ” appears on the display.
7 If you want to set the absolute start time of project 01 to a time other than
“00:00:00.00,” set it now. See “Recording” on page 33 for more information.
Otherwise, press the [ENTER] button.
The absolute start time for subsequent projects can be specified as and when they are
recorded.
The hard disk is now ready for use.