


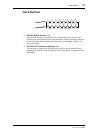

Transport Controls 13
D24—Owner’s Manual
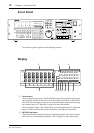
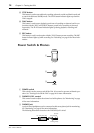
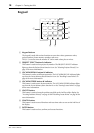
F MO disk drive slot
MO disks are loaded into the internal MO drive through this slot. See “Inserting &
Ejecting Disks” on page 25 for more information.
G Manual eject hole
This hole is used when disks cannot be ejected in the normal way. See “Ejecting Trou-
blesome Disks (emergency use)” on page 174 for more information.
H Eject button & activity indicator
This button is used to eject MO disks, but also functions as a drive activity indicator,
lighting up when the disk drive is busy. See “Inserting & Ejecting Disks” on page 25 for
more information.
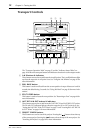
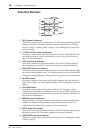
I AUTO PUNCH button & indicator
This button selects the Auto-Punch In/Out function. The AUTO PUNCH indicator
flashes when this function is on. See “Auto Punch In/Out Recording” on page 68 for
more information.
J SET button
This button is used in conjunction with the LAST REC [IN], LAST REC [OUT], [A],
and [B] buttons to set the LAST REC IN, LAST REC OUT, A, and B points, respectively.
See “Setting the LAST REC IN & OUT Points” on page 71 and “Setting the A & B
Points” on page 61 for more information. It’s also used in conjunction with the [RTN
TO ZERO] button to set the relative zero position. See “Using Absolute & Relative Zero”
on page 49 for more information.
The [SET] button is also used in conjunction with the [ENTER] button for the Auto
Memory Store function, and in conjunction with the [LOCATE] button to set the Key-
pad Timecode Input mode. See “Storing Locate Points Automatically” on page 65 and
“Locating Positions Directly” on page 63 respectively for more information.
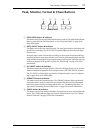
K REHE button & indicator
This button is used to engage Rehearsal Standby mode and, when pressed together with
the [PLAY] button, punch in rehearsal. In Rehearsal mode, recording can be practiced,
with automatic playback and input monitor switching at the punch in and out points,
without actually recording anything to disk. The REHE button indicator flashes in
Rehearsal Standby mode, and lights up continuously during rehearsal. See “Rehears-
ing” on page 36, “Manual Punch In/Out Rehearsal” on page 69, and “Auto Punch
In/Out Rehearsal” on page 72 for more information.
L REPEAT button & indicator
This button selects the A–B Repeat playback function. The REPEAT indicator lights up
when this function is on. See “A–B Repeat Playback” on page 47 for more information.
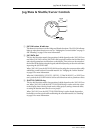
M REW button
This button is used to start rewind. Press it once for rewind at 8x normal play speed, the
REW button indicator flashes. Press it again for rewind at 16x normal play speed, the
REW button indicator lights up continuously. Pressing and holding the REW button
during playback rewinds at 8x normal play speed.
N FF button
This button is used to start fast forward. Press it once for fast forward at 8x normal play
speed, the FF button indicator flashes. Press it again for fast forward at 16x normal play
speed, the FF button indicator lights up continuously. Pressing and holding the FF but-
ton during playback fast forwards at 8x normal play speed.