


164 Chapter 14—SCSI & External Disk Drives
D24—Owner’s Manual
Copying Projects Between Disk Drives
Individual projects can be copied between disk drives using the Backup function.
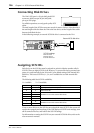
1 Turn off the D24 and external disk drives.
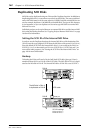
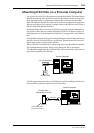
2 Connect the external disk drive to the D24 using a SCSI cable.
See “Connecting Disk Drives” on page 156 for more information.
3 Turn on the external disk drive and then the D24.
See “Turning On & Off the D24” on page 24 for more information.
4 Select the disk drive that contains the project that you want to copy as the
work disk.
See “Selecting the Work Disk” on page 161 for more information.
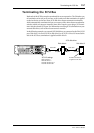
5 Press the [UTILITY] button.
The UTILITY indicator lights up.
6 Use the JOG/DATA dial to select “BACK UP,” and then press the [ENTER] but-
ton.
“FROM PROJ nn—project title” appears on the display (“nn” and “project title” being
the number and title of the project to be copied).
7 Use the JOG/DATA dial to select the project that you want to copy, and then
press the [ENTER] button.
“TO INT MO” appears on the display.
8 Use the JOG/DATA dial to select the destination disk, and then press the
[ENTER] button to mount it.
If you are copying to an external disk drive, “TO EXT m nn—ARE YOU SURE” appears
on the display (“m” being the SCSI ID of the external disk drive and “nn” being the
project number that will be assigned to the copy).
If you are copying to the internal MO disk drive, “TO INT MO nn—ARE YOU SURE”
appears on the display (“nn” being the project number that will be assigned to the
copy).
If the destination disk contains a project with the same number as the project to be cop-
ied, the copy is automatically assigned the next available project number.
9 Press the [ENTER] button to start the copying process.
The copying process starts and “COPYING” appears on the display.
When the copying process is complete, “FINISHED” appears on the display. Press the
[ENTER] or [CANCEL] button to return to step 7 to copy another project.
To copy a project from a different disk drive, select that disk drive as the work disk and
then copy. See “Selecting the Work Disk” on page 161 for more information.
10 Press the [UTILITY] button to leave utility.
The UTILITY indicator goes out.
The Backup function checks the amount of available space on the destination disk
before copying. If there isn’t enough space, the message “DISK FULL” appears.
If an error occurs (e.g., a disk is removed or the power is turned off) while using the
Backup function, the message “DRIVE ERROR” appears on the display.