


TASCAM DP-008EX
25
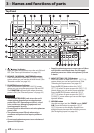
3 – Names and functions of parts
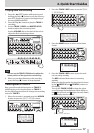
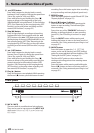
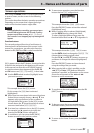
6 INPUT A/B TRIM knobs and OL indicators
Use the TRIM knobs to adjust the input levels for
INPUT A/B. (See “Making the first recording” on
page 47.)
If an input source level is too high its OL (overload)
indicator lights. If a TRIM knob is set too high
(higher than 2–3 o’clock usually), the OL indicator
could light even if the volume of the input source
signal is suitable.
7 MASTER LEVEL knob
Adjusts the level of the stereo signal output from
the PHONES and LINE OUT jack.
This knob also adjusts the recording level when
bouncing tracks, mixing down and mastering.
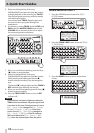
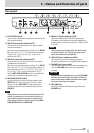
8 REVERB button
Press this button to open the
REVERB SETTING
screen. (See “Reverb” on page 61.)
Press this button and the EQ button at the same
time to open the
TRACK MUTE
screen. (See
“Muting tracks” on page 62.)
9 EQ button
Press to open the
EQ SETTING
screen where you
can set the track equalizer. (See “Track equalizers”
on page 61.)
Press this button and the REVERB button at the
same time to open the
TRACK MUTE
screen. (See
“Muting tracks” on page 62.)
0 Display
This shows various information.
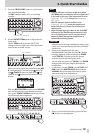
q REVERB knobs (TRACK 1–TRACK 8)
Use the REVERB knob for a track to adjust the
level (volume) of its playback signal or assigned
input signal that is sent to the reverb effect.
w PAN knobs (TRACK 1–TRACK 8)
Use to adjust the stereo position of the track
playback signal. (See “Stereo position (panning)”
on page 61.)
e LEVEL knob (TRACK 1–TRACK 8)
Use to adjust the level of the track. (See “Level and
balance” on page 61.)
r REC buttons/indicators (TRACK 1–TRACK 8)
Use to turn the track record function ON (arm for
recording) and OFF. To monitor the input signals
of the internal mics using headphones or an
external monitoring system (powered monitor
speakers or an amplifier and speakers), press that
track’s REC button. When a REC button is ON, its
REC indicator blinks when the recorder is stopped,
and lights when it is recording.
On the
INPUT ASSIGN
screen, press this button
to change the assignment.
On the
TRACK MUTE
screen, press this button to
turn track muting ON and OFF.
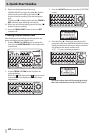
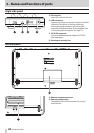
t Function buttons
The functions of these buttons depend on the
current screen. The functions currently assigned
to these buttons are shown at the bottom of the
display screen.
NOTE
•
In this manual, the four function buttons are
referred to as F1, F2, F3 and F4 in order from the
left.
•
The function buttons are assigned the following
functions on the Home Screen.
Stop (8) + F1 buttons: jump to the IN point
Stop (8) + F2 buttons: jump to the OUT point
F3: Set IN point
F4: Set OUT point
y MENU button
Press to open the
MENU
screen. (See “Menu
structure” on page 30.)
u HOME button
Press to open the the Home Screen. (See “Home
Screen” on page 29.)
When the unit is stopped and the Home Screen is
open, use this button to move the cursor between
time counter divisions. (See “Direct locate
function” on page 52.)
i METRONOME button
Press this button to open the
METRONOME
screen.
(See “Metronome” on page 69.)
o TUNER button
Press this button to open the
TUNER
screen. (See
“Tuner” on page 69.)
p DATA wheel
Use this to select items and change values on the
setting screens.. When the unit is stopped and the
Home Screen is open, turn to change the record/
playback position. (See “Direct locate function” on
page 52.)
a UN/REDO [HISTORY] button / indicator
Press this button to undo the previous action or to
redo the last undone action. (See “Undoing opera-
tions (undo)” on page 49.)
Press and hold this button to open the
HISTORY
screen. Use the screen to undo multiple opera-
tions at once (multi-undo).
This indicator lights when one or more operations
that have been undone can still be redone.
s TRACK EDIT button
Press this button when the recorder is stopped to
open the
TRACK EDIT
screen.