


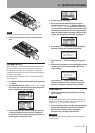


24 TASCAM DP-03
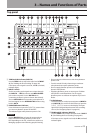
3 – Names and Functions of Parts
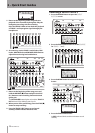
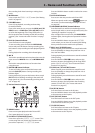
6 INPUT B switch
Set this according to the signal source input through
the INPUT B — MIC B connector or LINE B jack on
the rear panel. Set it to MIC/LINE when connecting
a microphone or line level signal. Set it to INTERNAL
MIC B when using built-in MIC B.
7 BOUNCE button
Press this button to switch between
MULTITRACK
and
BOUNCE
modes.
8 MIXDOWN/MASTERING button
Press this button to switch between
MULTITRACK
,
MIXDOWN
and
MASTERING
modes.
In
•
MULTITRACK
mode, press this button to switch
to
MIXDOWN
mode.
In
•
MIXDOWN
mode, press this button to switch to
MASTERING
mode if there is a stereo master track
or to return to
MULTITRACK
mode if not.
In
•
MASTERING
mode, press this button to return
to
MULTITRACK
mode.
NOTE
A pop-up appears when the mode changes.
9 REVERB button
Press to open the
REVERB SETTING
screen where
you can adjust reverb parameters. (See “Reverb” on
page 53.)
0 PHONES LEVEL knob
Use this to adjust the headphones output volume.
qEQ button
Press to open the
EQ SETTING
screen where
you can adjust track EQ parameters. (See “Track EQ
(equalizer)” on page 53.)
After opening the
EQ SETTING
screen with this
button, press F1 (INPUT) to open the
INPUT EQ
screen where you can adjust input EQ parameters. (See
“Using input EQ” on page 39.)
wEQ HIGH/EQ LOW knobs
Use EQ HIGH knob to adjust high-frequency gain on
EQ setting screens, including the
EQ SETTING
,
INPUT EQ
and
MASTERING EQ
screens.
Use EQ LOW knob to adjust the low-frequency gain
on EQ setting screens, including the
EQ SETTING
,
INPUT EQ
and
MASTERING EQ
screens.
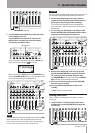
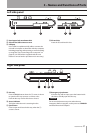
e Display
This shows various types of operation information.
r Function buttons
The functions of these buttons depend on the screen
currently displayed. The current function assignments
are shown at the bottom of the screen.
NOTE
For convenience, the four function buttons are referred to
in order from the left as F1, F2, F3 and F4 in this manual.
t REVERB knobs (TRACK 1–TRACK 8)
Use to adjust the level (volume) sent to the reverb
effect of the track’s playback signal or the input signal
assigned to that track.
y PAN knobs (TRACK 1–TRACK 8)
Use to adjust the stereo position of the track’s playback
signal or the input signal assigned to that track. (See
“Stereo position (panning)” on page 53.)
u REC buttons/indicators (TRACK 1–TRACK 8)
Use to arm a track for recording (turn recording
ON/OFF). To monitor a track’s input sound through
headphones or a monitoring system, press that track’s
REC button. When the track is armed for recording
(REC button ON), the REC indicator blinks when the
unit is stopped and lights when recording.
On the
INPUT ASSIGN
screen, press these buttons
to change the assignment.s
On the
TRACK MUTE
screen, press these buttons to
mute and unmute the tracks.
Press these buttons when the
TRACK EQ
screen is
open to select tracks.
iTrack faders (TRACK 1–TRACK 8)
Use to adjust the monitoring level of the track’s
playback signal or the input signal assigned to the
track. (See “Levels and balance” on page 53.)
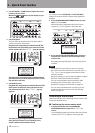
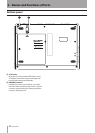
o CD button
Press this to open the
CD MENU
screen.
p MENU button
Press this to open the
MENU
screen.
a HOME button
Press this to open the Home Screen.
When the unit is stopped and the Home Screen is
open, use this button to move between the time
counter divisions. (See “Direct locate function” on page
44.)
s DATA wheel
Use this to change parameter values and select items
when using menus.
d METRONOME button
Press this to open the
METRONOME
screen. (See
“Metronome” on page 59.)
f TUNER button
Press this to open the
TUNER
screen. (See “Tuner” on
page 59.)
g MIC A
This built-in omnidirectional microphone becomes the
input source for INPUT A when set to INTERNAL MIC
A.
When using the tuner, use this built-in microphone to
input the sound of the instrument being tuned.
h MASTER fader
Use to adjust the stereo signal level output from the
LINE OUT jacks and PHONES jack. Use also to adjust