


10
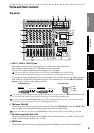
5PAN knobs
These knobs adjust the pan (position in the stereo field) of each channel.
6 CHANNEL buttons (1–8)
These buttons switch the status of each channel.
CH ON:
Use these buttons to switch the channels between enabled and disabled (muted). The but-
ton will be lit (orange) for channels that are enabled.
BOUNCE:
Use these buttons to switch the status of the channel when bounce recording. The
bounce-destination (the channel to be recorded) will blink red, and the bounce-sources (the play-
back channels) will be lit green.
REC/PLAY:
Use these buttons to switch between recording and playback for each channel. (Red
for recording, green for playback.)
You can also use these buttons as the “1–8” buttons for numeric input (→p.21, 35).
7 Channel faders (1–8)
These adjust the volume that is sent from each channel to the master bus.
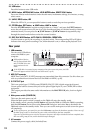
8 FOOT SWITCH jack
By connecting a foot switch (we recommend the separately sold KORG PS-1 pedal switch) you can
use it to punch-in/out when performing manual punch recording (
→
p.29
, 40
).
9 CH ON button
When this button is on (lit orange), you can use the
channel buttons
to switch each channel
between enabled and disabled. You can also use this as a mute function.
10 BOUNCE button (0)
When this button is on, you can use the
channel buttons
to specify each channel as a bounce des-
tination (record) or bounce-source (playback).
You can also use this button as the “0” button for numeric input (→p.21, 35).
11 REC/PLAY button
When this button is on (lit), you can use the
channel buttons
to switch each channel of the track
recorder between recording and playback. The track setting will alternate each time you press a
channel button
. If the master track’s
channel button
is in Play mode all other tracks will auto-
matically be muted (silent), and if it is in Record mode all other tracks will automatically be in Play
mode.
12 MASTER fader
This adjusts the overall volume. When you’re recording the master track, this sets the recording
level.
When recording, you will normally leave the MASTER fader at 0 dB and adjust the channel faders so that the
output does not distort.
13 MASTER button (9)
As you repeatedly press this button, the master track will cycle between Record (lit red), Play (lit
green), and Off (dark).
You can also use this button as the “9” button for numeric input (→p.21, 35).
14 Transport buttons
Use the
REC button
,
PLAY button
,
STOP button
,
REW button
, and
FF button
to perform
recorder operations such as playback and recording (
→
p.21).
15 Monitor LEVEL knob
If the
OUTPUT ASSIGN
(19) button is set to
“MST/MON”
this knob will adjust the output vol-
ume of the
MONITOR L
,
R
jacks; if the button is set to
“INDIVIDUAL”
this knob will adjust the
volume of the OUTPUT jacks for mixer channels 1 and 2.
16 OUTPUT jacks
You can connect external devices to these jacks. The audio signals sent from these jacks will
depend on the setting of the
OUTPUT ASSIGN (19)
. These are unbalanced outputs that accom-
modate 1/4" phone jacks.