


30
5) Specify how playback will occur before and after the
recording.
Use the cursor up/down buttons to select “Pre=...” (the
location at which playback will start, before the begin-
ning of recording) or “Post=...” (the location at which
playback will end, after the end of recording), and
press the ENTER/OK button.
The point setting screen will appear in the display.
6) Use the point setting screen to specify the locate
points.
Refer to “Setting the In, Out, Pre, and Post locate
points”.
7) Press the LEVEL METER button to return to the Level
Meter screen.
8) Begin recording.
• When you press the REC button, you will move to the
locate point specified by “Pre=...” and enter record-
ready mode (REC button blinking).
• When you press the PLAY button, playback will
begin. Recording will occur from the locate point spec-
ified for “In=...” (The REC and PLAY buttons will
light.)
9) Stop recording.
• Recording will stop when you reach the locate point
specified for “Out=...” and playback will resume. (The
REC button will go dark and the PLAY button will
light.)
• Playback will stop when you reach the locate point
specified for “Post=...”
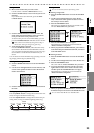
Setting the In, Out, Pre, and Post locate points
To set the locate points, you can enter them numerically in
the point setting screen, or you can store them beforehand as
marks (→p.22).
After selecting a mark, you can also make fine adjustments to its
value if desired.
If the locate point you specify does not meet the following condi-
tion, an error indication will appear, and the setting will not be ac-
cepted.
Pre ≤ In < Out < ≤ Post
Using numeric input
1) Use the cursor up/down buttons to select “In=...” (or
“Out=...”, “Pre=...”, “Post=...”), and press the ENTER/
OK button to access the point setting screen.
2) Use the cursor left/right buttons to select the desired
position, and use the cursor up/down buttons to select
a numeric value.
You can also use the channel buttons to enter numeric
values directly, instead of using the cursor up/down but-
tons.
By pressing the STORE button at this time, you can
specify the current location as the point.
3) When you’re finished entering the point, press the
ENTER/OK button to confirm your entry.
Using marks
1) Use the cursor up/down buttons to select “In=...” (or
“Out=...”, “Pre=...”, “Post=...”), and press the ENTER/
OK button to access the point setting screen.
2) Use the JUMP buttons to select the stored mark that
corresponds to the desired locate point.
You can use step 2) of “Using numeric input” to adjust
the value if desired.
3) Press the ENTER/OK button to confirm your entry.
1-2. Repeat recording
If “Repeat” is turned on in the Rec/Play Mode screen when
you make auto punch-in/out settings, the IN-OUT region
will be recorded repeatedly.
1) Make auto punch-in/out settings.
Refer to steps 1) through 6) of the preceding section
“Auto punch-in/out”.
2) Use the cursor up/down buttons to select “Repeat” and
press the ENTER/OK button.
A check mark will be added (the setting will be on), and
the REPEAT LED will light.
3) Specify the locate points for auto punch-in/out.
Refer to steps 7) through 11) of the preceding section
“Auto punch-in/out”.
4) Start recording.
• When you press the REC button, you will move to the
locate point specified by “Pre=...” and enter record-
ready mode. (The REC button will blink.)
• When you press the PLAY button, playback will
begin. Recording will occur from the locate point spec-
ified by “In=...” (The REC and PLAY buttons will
light.)
• When you reach the locate point specified by
“Out=...” recording will end and playback will
resume. (The REC button will be dark and the PLAY
button will light.)
• When you reach the locate point specified by
“Post=...” playback will stop.
• Then you will move to the locate point specified by
“Pre=...” and the same operations will continue
repeating.
• When you are satisfied with the performance you re-
recorded, press the STOP button outside the recorded
region (IN-OUT) to stop repeating.
You can use the Undo/Redo function to compare and choose
between the most recent recording and the recording that pre-
cedes it.
5) Listen to the recorded performance.
•Press the PLAY button to play back, and listen to the
recorded performance. If “Repeat” is on, playback
will occur from the IN (punch-in) location to the OUT
(punch-out) location.
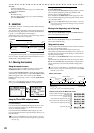
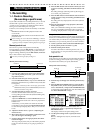
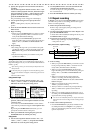
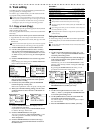
Auto punch-in/out, repeat recording
Punch-in
Punch-out
In
Out
Post
Pre
Start repeating
Stop repeating
Stop recordingStart recording
Playback Playback
Recording