


27
Operation
Level Meter
screen
Song and
Location
MixerRecording
(basic)
Recording
(advanced)
PlaybackEffectsEditingOther
After recording, the screen will indicate “Working...” while the
Undo data is being created. This process will require a correspond-
ingly longer time for completion as the length of the song is longer.
Procedure for completing a song
To create a song, you will start by recording the tracks for
each of the channels. You can record up to eight channels si-
multaneously, or you can record them one by one (overdub-
bing).
If you use up all eight tracks, you can perform bounce record-
ing to free up some tracks and then record additional materi-
al on those tracks.
If you want to keep the original recordings that you bounced, you
can switch the virtual track for those channels and record on them
again without overwriting the original recordings.
By repeatedly bounce-recording and overdubbing on up to
eight tracks in this way, you will finish recording your chan-
nel tracks.
Then you will create the final mixdown by recording it on the
master track in stereo.
The master track is recorded as a stereo 16-bit 44.1 kHz WAV
file. This means that you can connect your computer and
write that file to digital media to create an audio CD or the
equivalent.
A new master track WAV file for this song is created every
time you mix down (i.e., every time you record the master
track), so you can create different mixes and choose the best
one later.
A master track WAV file is created in the song folder each time
you record, up to the available capacity of the hard disk drive.
However, the
D888
is able to recognize only one hundred such
files.
The most recently recorded WAV file will be selected for the mas-
ter track. If you want to hear a master track WAV file that you re-
corded earlier, select the desired file as described in p.39 “2-4.
Selecting a master track file (Master)”.
2-1. Recording channel tracks
Here’s how to record channel tracks. You can record up to
eight channels simultaneously.
1) Create a new song (→p.21 “1-1. Creating a new song”).
2) Connect an audio source to the channel on which you
want to record it (→p.24 “1-1. Connecting audio
sources”).
3) Put the channel to be recorded in Record mode.
•Turn the REC/PLAY button on, and set the appropri-
ate channel button to Record mode (lit red).
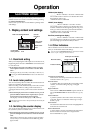
4) Adjust the input level.
Adjust the TRIM knob so that the PEAK LED does not
light when the audio input source is at its maximum vol-
ume.
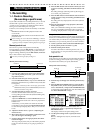
When making this adjustment, you can switch the dis-
play to the Level Meter screen and press the EXIT/CAN-
CEL button to select the input display (IN) so that you
can view the levels.
5) Adjust the monitor level (→p.24 “1-3. Adjusting the
monitor level”).
6) Move the current location to the point at which you
want to start recording.
You can move to the beginning of the song by holding
down the STOP button and pressing the REW button.
7) Put the recorder in record-ready mode.
Press the REC button (it will blink).
8) Begin recording.
Press the PLAY button. (The REC and PLAY buttons will
light.)
Begin performing.
9) Stop recording.
When you’ve finished performing, press the STOP but-
ton. (The REC and PLAY buttons will go dark.) Return
to the location at which you began recording, and verify
that the performance was recorded correctly.
You can return to the location at which recording began by se-
lecting Last Rec In in the mark list of the Mark Edit screen.
2-2. Overdub recording
Here’s how to record additional performances on other tracks
while you listen to the previously-recorded performances.
1) Connect an audio source to the channel on which you
want to record it (→p.24 “1-1. Connecting audio
sources”).
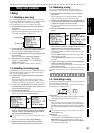
2) Select the tracks for playback.
Press the REC/PLAY button, and press the channel but-
tons to select Play mode (button lit green) for each track
that you want to hear.
3) Select a track for recording.
Press the appropriate channel button to select Record
mode (button lit red).
4) Record.
Refer to steps 4) through 9) in the preceding section “2-2.
Recording channel tracks”.
2-3. Bounce recording
The
D888
can record a maximum of eight channels simulta-
neously, but you can use “bounce recording” to combine
these eight channels into two channels or one channel.
While you listen to the playback of the bounced tracks, you
can continue overdubbing to built up a complex arrangement
as though you were using a 16-track or 32-track recorder.
To free up extra tracks for recording, you can bounce multi-
ple tracks down to two tracks (stereo) or to one track (mono).
You can also use an effect while bounce-recording (→p.33).
When bouncing to one track, you can choose any track. However
when bouncing to two tracks, you can only select a pair of adjacent
tracks (1-2, 3-4, 5-6, or 7-8).
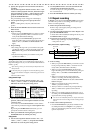
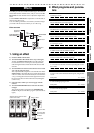
Combining multiple tracks into two tracks (stereo)
If the bounce-destination already contains recorded data, it
will be overwritten and replaced by the newly recorded data;
i.e., you will lose the previously recorded data. If you want to
preserve the data on the tracks/virtual tracks you will be
bouncing to, you can copy the data to a different set of virtual
tracks before you begin bounce recording. Alternatively, you
could copy the track data to a computer via USB as a safety
back up.
1) Make sure that you’ve selected the desired virtual
track for each playback track you want to bounce.
If there are any tracks you don’t want to include,in the bounce
recording, lower their faders or press the CH ON button and
then press the corresponding channel buttons to mute (si-
lence) those tracks.
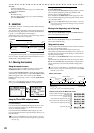
2) Press the BOUNCE button, and then press the two
channel buttons for an adjacent pair of tracks to spec-
ify the bounce-destination.
The channel buttons you selected as the bounce-desti-
nation will blink red.
The bounce-destination can be a stereo set of tracks (1-2, 3-4,
5-6, or 7-8), and the two tracks will contain the L and R chan-
nels respectively.
You cannot select any combination of tracks other than 1-2,
3-4, 5-6, or 7-8. If you press any other combination of channel
buttons, the valid combination of channels for the button you
last pressed will be enabled.
Recording
(basic)