Torq MixLab User Guide » Chapter 1
30
Torq MixLab User Guide » Chapter 7
30
< Adding Multiple Folders
You may find that one folder will contain many folders that you’d like to add to the Database. A great example of
this is when your music is automatically sorted by a program like Apple iTunes. Typically, there will be a folder
for each artist in your collection, and each of these folders will contain individual folders for each album by that
artist. Therefore, if you want to add all the music by this particular artist to the Database, you actually need to
add all of the individual album folders.
To make this easier, Torq LE includes an option for adding folders, including their subfolders, to the
Database:
1. Use the Browser to locate the folder containing the sub-folders you want to add.
2. Right-click (CTRL-click on Mac) the folder and select “Add folder to Database Recursively.” Torq LE will
automatically add the folder, along with all its sub-folders, to the Database.
< Adding Folders from Your OS
If you’d prefer, you can add folders to the Database by dragging them from your operating system into the Torq
LE Browser. You can do this using either Explorer for Windows or Finder for Mac.
1. Find your desired folders using the tools of your operating system (Explorer or Finder).
2. Click and drag the folder from the operating system into the Browser.
3. Release the mouse button and the folder will be added to the Database.
Note: You can also include the subfolders by holding the Alt key while dragging the folder into the
Database.
< Searching Specific Database Folders
Clicking on the Database heading will display every song contained in the Database in the File List to the
right of the Browser window. If you would like to confine your search to only a particular folder within the
Database:
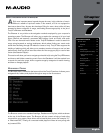
1. Click the (+) in front of the Database heading. The list will expand to show all of the folders contained in
the Database.
2. Click on one of the folders. The File List will be updated to only show the songs contained in that specific
folder.
< Removing Folders from Database
There are two ways to remove folders from the Database. You can either search through the folders currently
listed within the Database and remove them, or you can locate the original folders on your hard drives to remove
them.
To remove folders directly from the Database:
1. Click the plus sign next to the Database. This will drop down a list of all folders assigned to the
Database.
2. When you have found the folder you want to delete, right-click it.
3. Choose “Remove from database” from the pop-up menu. The folder will then be removed from the
Database while the original audio files will still remain on your hard drives.
To remove folders from the Browser:
1. Use the Browser to locate the original folder on your computer.
2. Right-click the folder to display the pop-up menu.
3. Click “Remove from Database” to remove this folder only. If the folder contains sub-folders that are part
of the Database, they will remain in the Database.
4. Click “Remove from Database Recursively” to remove this folder, along with all of its sub-folders, from the
Database.


