


71
Detailed Settings for Various Functions
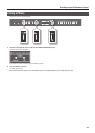
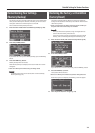
Microphone Settings (Mic)
Turning the Microphone Input On/O
(Mic Sw)
You can use this setting to temporarily turn the microphone input o.
Setting Explanation
On Turns the microphone input on.
O Turns the microphone input o.
* This will automatically turn “On” when you connect a microphone,
and will automatically turn “O” when you disconnect the micro-
phone.
* You can’t turn this “On” if a microphone is not connected.
MEMO
You can assign the microphone Input On/O function to a pedal
(p. 73).
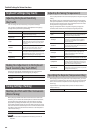
Adding Reverberation to Your Voice
(Mic Reverb)
Here you can add reverberation to your voice from the microphone.
Reverberation can improve the sound of your vocals.
Setting Explanation
O, 1–10 Higher values produce deeper reverb.
* Mic reverb will not be applied if the reverb eect is o (p. 25).
MEMO
The amount of microphone reverb will depend on the depth of the
reverb eect.
Changing How Harmony is Applied
(Harmony Type)
Here you can change the way in which harmony is applied.
Setting Explanation
Duet
One voice of harmony will be added to your
voice.
Trio
Two voices of harmony will be added to your
voice.
Quartet
Three voices of harmony will be added to your
voice.
Adjusting the Volume of the Harmony
(Harmony Level)
This setting adjusts the volume of the harmony.
Setting Explanation
0–10
Increasing the value will make the harmony
sound louder.
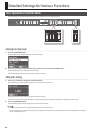
Editing the Equalizer Settings
(Equalizer)
You can use the equalizer to modify the tonal character of the sound
by boosting or reducing just the low-frequency or high-frequency
range of the sound.
1. Enter Function mode, and choose “EQUALIZER” (p. 64).
2. Press the [PIANO] button.
3. Use the [-] [+] buttons to select the equalizer number that
you want to edit.
4. Press the [PIANO] button.
5. Use the [-] [+] buttons to select the equalizer item that you
want to edit.
6. Press the [PIANO] button.
If you press the [DISPLAY] button, the cursor will return to the item.
7. Use the [-] [+] buttons to edit the setting.
Indication Setting Explanation
High Gain -12–+12 dB
Adjusts the level of the high-
frequency range.
High Freq 1.25 k–16 k (Hz)
Frequency point in the high-
frequency range. Generally, this
changes the level at and over this
frequency.
High Mid
Gain
-12–+12 dB
Adjusts the level of the mid- to
high-frequency range.
High Mid Freq 16–16 k (Hz)
Frequency point in the mid- to
high-frequency range. This changes
the level of the specied bandwidth
centered on this frequency.
High Mid Q 0.5, 1.0, 2.0, 4.0, 8.0
Changes the bandwidth of the
mid- to high-frequency range. The
bandwidth aected by the controls
narrows as the value increases.
Low Mid Gain -12–+12 dB
Adjusts the level of the low-
frequency range to midrange.
Low Mid Freq 16–16 k (Hz)
Frequency point in the low-frequen-
cy range to midrange. This changes
the level of the specied bandwidth
centered on this frequency.
Low Mid Q 0.5, 1.0, 2.0, 4.0, 8.0
Changes the bandwidth of the low-
frequency range to midrange. The
bandwidth aected by the controls
narrows as the value increases.
Low Gain -12–+12 dB
Adjusts the level of the low-
frequency range.
Low Freq 100–1 k (Hz)
Frequency point in the low-
frequency range. Generally, this
changes the level at and below this
frequency.
* Sounds may become distorted as the Gain level increases.