


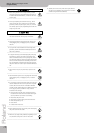

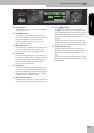
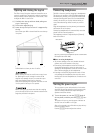
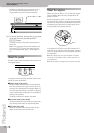

Panel descriptions
8
r
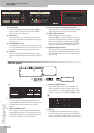
KR111
Digital Intelligent Piano
2. Panel descriptions
Front panel
A
[Power On] switch
This button allows you to switch the KR111 on and
off (see p. 13).
B
[Function] button
This button provides access to the FUNCTION menu.
You can use the
[√][®]
buttons to select the desired
function.
C
[Part Balance] button
Press this button to select the part whose level you
want to change with respect to that of the other
parts. The parts available here are: Upper, Layer, Split,
ADrums, ABass, and Accomp (this is a group of 6
parts).
Note:
There is also a
[Balance]
knob that allows you to set
the volume balance of entire sections. See page 22.
D
[Transpose] button
Press this button to select the display function that
allows you to set a transposition interval. You can
also specify which sections should be transposed
(page 22).
Press it together with the
[Reverb]
button to select
the KR111’s demo mode (page 15).
E
[Reverb] button
Press this button whenever you want to change the
settings of the digital reverb effect (page 41). Press it
together with the [Transpose] button to select the
KR111’s demo mode (page 15).
F
[Volume] knob
Use this knob to set the global volume of your KR111.
G
[Brilliance] knob
Use this knob to change the brightness of the sounds
played by the KR111.
H
[Balance] knob
This knob allows you to set the balance between the
Arranger or song parts (“Accomp”) and the solo
sounds (“Keyboard”).
I
[User Program] button
Press this button whenever you want to select a User
Program (a set of registrations) or to save the current
panel and parameter settings to a User Program.
There are 34 User Program memories. See page 48.
J
[Style Orchestrator] buttons
Press one of these buttons to choose the desired
orchestration for the selected Music Style. See
page 21.
K
[Music Style] buttons
These buttons allow you to select Music Style fami-
lies. When you press a button, the first Style of the
selected family is immediately recalled. The button of
the selected family lights. Note that the KR111 mem-
orizes your selection within each family, and immedi-
ately recalls the last Style you used within that fam-
ily.
The last button ([User]) provides access to the Music
Style in the KR111’s temporary area or Styles on an
inserted floppy disk.
L
[Fill In] buttons
These buttons have two functions: you can use them
to select the desired accompaniment pattern for a
Music Style (while the Arranger is stopped), or to
switch from the accompaniment pattern to a Fill-In
during a performance (page 19).
M
[Intro/Ending] button
Press this button when you want to start a Style per-
formance with an introduction, or to stop Music
Style playback with a musical ending. When you
press the [Arranger] button, the Intro pattern is auto-
matically selected.
If you press it during Style playback, this button
selects the Ending pattern.
N
[Start/Stop] button
Press this button to start or stop Style playback. Press
it together with the [Intro÷Ending] button to switch
the Sync Start function on or off.
Style Orchestrator Fill In
Sync
Pop
Rock
Start
Stop
Intro
Ending
To Variation
Basic
User Program
Reverb
Demo
Function Part Balance
Balance
KeyboardAccomp
Volume Brilliance
Transpose
Advanced
Full
To Original
Trad
Kids
Latin
Gospel
Big Band
Swing
Oldies
Country
Ballad
Acoustic
K
LMN
Music Style
A
BCDE
FGH I
J