


EXR-7
59
You can also use an optional footswitch for starting and
stopping recording. Doing so has the advantage that you
can use both hands for playing (or the left hand for Pitch
Bend/Modulation effects and the right for playing the
melody.)
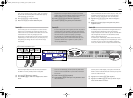
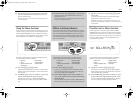
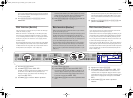
• Connect an optional DP-2, DP-6, or BOSS FS-5U foot-
switch to the FOOTSWITCH socket on the EXR-7’s rear
panel.
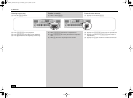
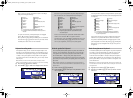
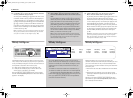
• Press the [FUNCTION] button (it must light).
• Use FAMILY [√][®] to select “KB SET”.
The EXR-7’s Function parameters are divided into 16 logi-
cal “families”. For the following, we need to select the
group that contains the global keyboard settings.
• Use SELECT [√][®] to select the “FSW” parameter.
Note: See also “Working with the FAMILY, SELECT and numeric
buttons” (p. 38).
• Use the [–]/[+] buttons to select “Punch I/O”.
• Press [SONG] to return to the recording function.
• Continue with step (1) under “Punch I/O”.
In steps (5) and (7), press the footswitch (rather than the
[REC≈∏] button).
Using a footswitch for punching in/out
También puede utilizar un conmutador de pedal opcional
para iniciar y detener la grabación. Esto tiene la ventaja
que es posible utilizar ambas manos para interpretar (o la
mano izquierda para los efectos Pitch Bend/Modulation y
la derecha para interpretar la melodía.)
• Conecte un conmutador de pedal DP-2, DP-6, o BOSS
FS-5U opcional en el zócalo FOOTSWITCH en el panel pos-
terior del EXR-7.
• Pulse el botón [FUNCTION] (debe iluminarse).
• Utilice FAMILY [√][®] para seleccionar “KB SET”.
Los parámetros de funciones del EXR-7 se dividen en 16
“familias” lógicas. Para la siguiente parte, es necesario
seleccionar el grupo que contiene los ajustes de teclado
globales.
• Utilice SELECT [√][®] para seleccionar el parámetro “FSW”.
Nota: Consulte también “Trabajar con FAMILY, SELECT y los
botones numéricos” (p. 38).
• Utilice los botones [–]/[+] para seleccionar “Punch I/
O”.
• Pulse [SONG] para volver a la función de grabación.
• Continúe con el paso (1) en “Punch I/O”.
En los pasos (5) y (7), pulse el conmutador de pedal (en
lugar del botón [REC≈∏]).
Utilizar un conmutador de pedal para el pinchado
de entrada/de salida
Vous pouvez aussi utiliser un commutateur au pied en
option pour lancer et arrêter l’enregistrement. Cette
méthode est avantageuse car elle vous permet de garder
les deux mains libres pour jouer sur le clavier (ou de pilo-
ter les effets Pitch Bend/Modulation de la main gauche
tout en jouant la mélodie de la main droite.)
• Branchez un commutateur au pied DP-2, DP-6 ou BOSS
FS-5U en option à la prise FOOTSWITCH sur le panneau
arrière de l’EXR-7.
• Appuyez sur le bouton [FUNCTION] (il doit s’allumer).
• Utilisez FAMILY [√][®] pour sélectionner “KB SET”.
Les paramètres Function de l’EXR-7 sont divisés en 16
“familles” selon une répartition logique. Dans le cas pré-
sent, il suffit de choisir le groupe contenant les réglages
d’ensemble du clavier.
• Utilisez SELECT [√][®] pour choisir le paramètre “FSW”.
Remarque: Voyez aussi “Utilisation des boutons FAMILY, SELECT
et des boutons numériques” (p. 38).
• Utilisez les boutons [–]/[+] pour choisir “Punch I/O”.
• Appuyez sur [SONG] pour retourner au mode d’enregistre-
ment.
• Reprenez l’étape (1) sous “Punch I/O”.
Aux étapes (5) et (7), actionnez le commutateur au pied
(au lieu d’enfoncer le bouton [REC≈∏]).
Enregistrement Punch I/O avec un commutateur au
pied
FUNCTION
Sustain
SELECT
EXR-7_GBEF.book Page 59 Monday, April 19, 2004 3:36 PM