


IMPORTANT SAFETY INSTRUCTIONS
TASCAM DP-02/DP-02CF 27
1 – Starting out with your DP-02/DP-02CF
This is the last stage in cresting a song, allowing you to
creat a file which you can play back into a stereo recorder,
and export to a WAV file for further processing, archiving,
recording, etc. on a personal computer (“Exporting the
mastered stereo tracks” on page 47).
Mixdown and matering
This is the art of mixing the different tracks you have
recorded earlier so that the whole song sounds “right”–
everything is at the right volume, and the song sounds like
one piece of music.
T I P
The most important components of a mix are your
ears—if you think it sounds good, then it is.
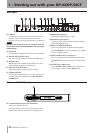
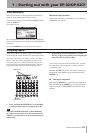
Use the eight track faders to adjust the relative volume
of the tracks and the MASTER fader to adjust the over-
all level, and watch the L and R meters at the right of the
display to make sure that the mix is not too loud (if it’s too
loud, it will distort, and sound bad).
T I P
You don’t have to keep levels the same through the
whole song (try raising the level of a guitar during
solos, for example).
Use the EQ HIGH and EQ LOW (tone) controls to boost or
cut bass and treble from the individual tracks.
If you have an external effect processor connected through
the SEND and RETURN loop, adjust the EFFECT SEND
levels for each track. This is the amount of signal sent from
each track to the effect. You can use this to add effects
only to certain tracks. Use the EFFECT RETURN control
to adjust the amount of the effect returned to the mix.
NOTE
On the DP-02, you can use the internal reverb unit
instead of an external effect processor (see “Reverb“
on page 62).
Use the PAN controls to adjust the left-right position of
each track in the stereo mix.
To cut out the sound of a track, use the SHIFT key and the
track’s REC key to mute (the orange MUTE indicator lights
for muted tracks) and un-mute the track.
T I P
If you have two tracks with different versions of the
same part, you can use the mute function to make
easy comparisons between the two.
NOTE
The track meters show the level of the signal recorded
on the track, not the level sent from the track.
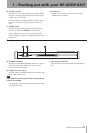
Mixdown
Mastering
This is where the actual stereo recording takes place, once
you’re happy with the mix you’ve created. You create a
mixed master stereo track, starting at 00:00:00:00 (the
“zero point”) and continuing to the OUT point.
The mixed stereo master is stored on disk as part of the song.
NOTE
A song can only hold one stereo master mix.
Before starting the mastering procedure, you must set the
OUT point. This is where the mastering process stops. See
“IN and OUT marks” on page 30 for details.
NOTE
While the unit is in the mastering mode, you will
notice that a number of playback functions are not
available. If you try to perform these operations, a
popup message tells you that you are in mastering
mode.
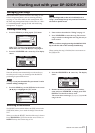
1. Press the MASTER key so that it flashes.
2. Press and hold the RECORD (
–
) key and press the
PLAY (¥) key. Recording starts on the stereo master
tracks (RECORD (
–
) and PLAY (¥) are lit).
Make the mix moves (faders, pan, etc.) that you
practiced earlier. These mix moves will affect the
sound of the final master stereo track. When the
playback point reaches the OUT point, recording
stops.
NOTE
You can hear any signals received at the STEREO MIX
inputs, but they won’t be recorded on the master
track.
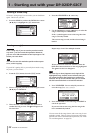
3. Press and hold the SHIFT key and press the PLAY
(MASTER) key so that it is lit steadily. Now when
you press PLAY (MASTER), you can hear the master
stereo mix you have just created. This mix is output