29
MR-8 Owner’s Manual
INPUT A
BALANCE
UNBALANCE
MIC
1
2
3
4
TRACK 1
TRACK 2
TRACK 3
TRACK 4
REC SEL
INPUT A
BALANCE
UNBALANCE
MIC
1
2
3
4
TRACK 1
TRACK 2
TRACK 3
TRACK 4
INPUT B
BALANCE
UNBALANCE
5/6
TRACK 5
TRACK 6
7/8
TRACK 7
TRACK 8
REC SEL
DC IN
POWER
USB
FOOT SW
DIGITAL
OUT
INPUT A SELECT
GUITAR
INT MIC
MIC/LINE
LIGHT
12V
ON
OFF
[INPUT A SELECT] switch
INPUT A SELECT
MIC/LINE
INT MIC
GUITAR
INPUT A SELECT
MIC/LINE
INT MIC
GUITAR
INPUT A SELECT
MIC/LINE
INT MIC
GUITAR
MR-8 recording basics
Before starting recording, we recommend to understand the MR-8 recording basics (such as
the relation between the input jacks and tracks and useful recording functions) described
below.
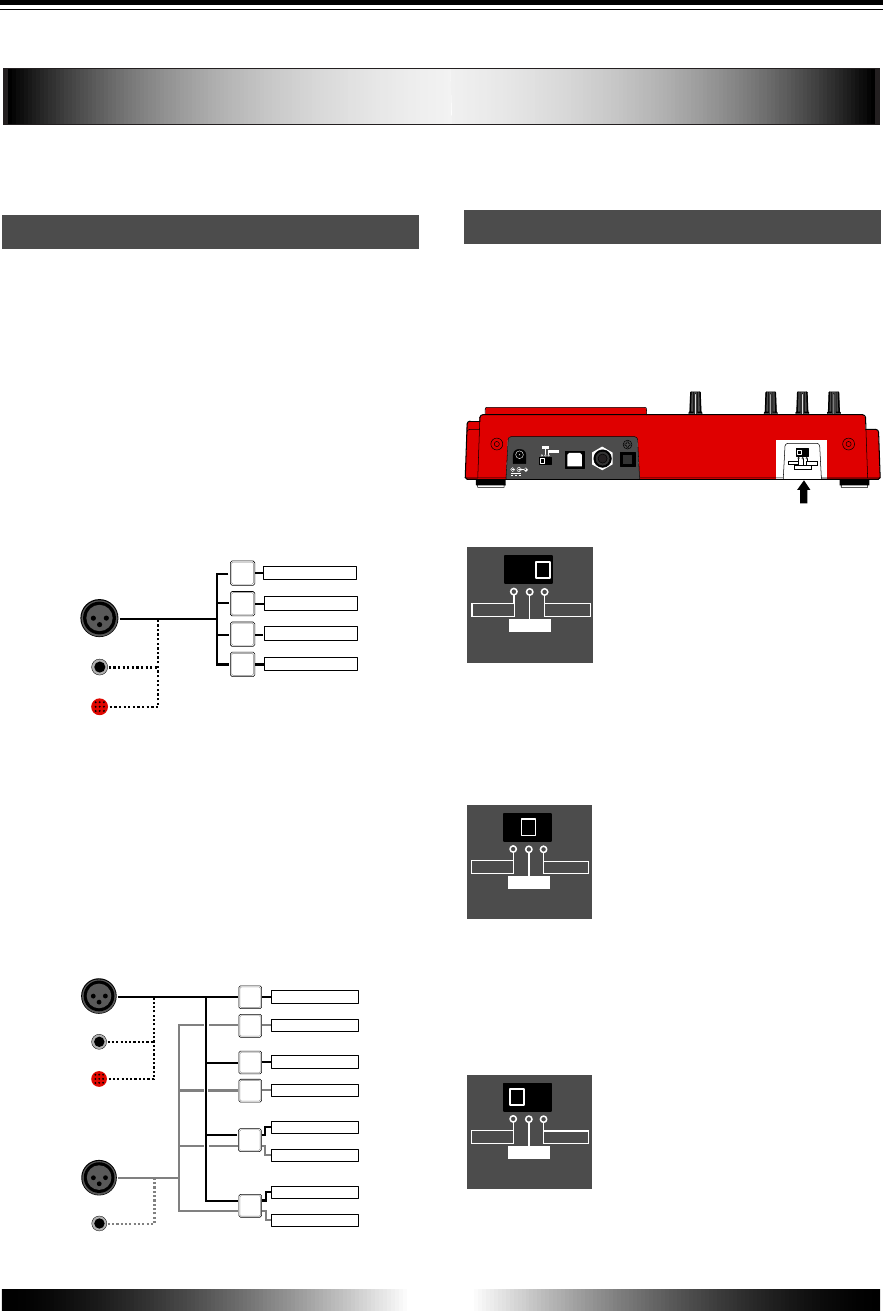
Relation between the input jacks and tracks
The MR-8 provides eight tracks (1 through 8)
and you can record onto a selected mono track
or stereo tracks at a time.
Depending on whether you select a mono track
or stereo tracks for recording, use the input jacks
appropriately as described below.
• Recording onto a mono track
Select a recording track by pressing any one of the
[REC SELECT] keys. When selecting a mono recording
track, only the [INPUT A] section can be used. Note
that you cannot use the [INPUT B] section.
• Recording onto stereo track
Select a pair of recording tracks (1 and 2, 3 and 4, 5/6,
or 7/8) by pressing the appropriate [REC SELECT]
key(s). Note that you can select tracks 5/6 or 7/8 by
pressing a single key, while you have to select tracks
"1 and 2" or "3 and 4" by pressing appropriate two
keys. When selecting stereo recording tracks, both the
[INPUT A] and [INPUT B] sections can be used. The
signals from the [INPUT A] and [INPUT B] sections are
recorded onto the odd and even tracks, respectively.
[INPUT A SELECT] switch
An internal microphone is built in the [INPUT A]
section. You can select a sound source of the [IN-
PUT A] section between this built-in microphone
or an external source (a guitar or mic/line source)
using the [INPUT A SELECT] switch.
MIC/LINE:
Set the switch to this position when
connecting an external microphone
or line-level source such as a key-
board. Both the [BAL] XLR and
[UNBAL/GUITAR] phone connectors
can be used. Use the [TRIM] control
to adjust the input level. When set-
ting the switch to the MIC/LINE po-
sition, the microphone simulation ef-
fect can be inserted.
GUITAR:
Set the switch to this position when
connecting a guitar. Both the [BAL]
XLR and [UNBAL/GUITAR] phone
connectors can be used. Use the
[TRIM] control to adjust the input
level and use the [DISTORTION] con-
trol to control the distortion applied
to the source. When setting the
switch to the GUITAR position, the
guitar amplifier simulation effect can
be inserted.
INT MIC:
Set the switch to this position when
using the built-in microphone. Use
the [TRIM] control to adjust the in-
put level. When setting the switch
to this position, you cannot use the
[INPUT A] input connectors, as well
as the insert effect.


