


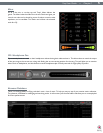


Torq User Guide » Chapter 1
9
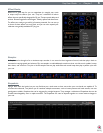
Torq User Guide » Chapter 2
9
INSTALLATION
Note
: The following directions are for installing the Torq software onto your computer. Torq will not run, however, unless an
appropriate M-Audio hardware device (such as the Conectiv interface) is installed and plugged in to your computer. Please follow
the installation instructions provided with your hardware device before launching Torq.
Windows XP
1. Place the Torq disc in your CD/DVD drive.
2. Windows will automatically launch the install screen. If the install screen fails to launch, you can manually start it by
clicking on Start > My Computer > Torq CD-ROM.
3. Select Torq from the drop-down menu and click “Install.”
4. The Installation Wizard will appear. Choose “Next.”
5. The License Agreement window will appear. Select “I accept the agreement” then choose “Next.”
6. Windows will prompt you to select a destination folder. The default path is C:\Program Files\Torq. If you would like to
install Torq in another location, click the “Browse” button and choose a new location.
7. When you have chosen an install folder, click “Next.”
8. You will be asked where Torq should install the application shortcuts in the Windows Start menu. If you are not familiar
with this, leave the default selection and choose “Next.”
9. The installer will give you the option of creating a desktop icon. This icon is used to quickly launch Torq directly from
your desktop. Make your selection and choose “Next.”
10. Conrm your install settings and choose “Install.”
11. Torq will begin installing, its process indicated by a Windows progress bar.
12. When Torq is nished installing, choose “Finish.”
13. Close the installer screen.
14. Double-click the Torq application icon to launch the program.
Macintosh OS X
1. Place the Torq disc in your CD/DVD drive.
2. Double-click the Torq CD icon on your desktop. This will display the contents of the CD.
3. Double-click the “Open Me” icon.
4. Select Torq from the drop-down menu and click “Install.”
5. The Torq installer welcome screen will appear. Click “Continue.”
6. The Software License Agreement window will appear. Click “Continue.”
7. Choose “Agree” from the drop-down dialog box.
8. Select a drive on which to install Torq and click “Continue.”
Note: By default, the “Applications” folder on your main hard drive will be selected; if you would like to select another folder, click
“Choose” and make a selection.
9. Click “Install” to begin the installation.
10. When installation has completed, select “Close.”
11. A Torq shortcut icon will be displayed on your desktop. Double-click the icon to launch the program.