


Torq User Guide » Chapter 1
50
Torq User Guide » Chapter 9
50
< Adding Songs to a Playlist
Once you have created and selected a Playlist, you’ll begin adding les to it using the following procedure:
1. Using the Browser or Database, locate the song you’d like to add to the Playlist.
2. Right-click (CTRL-click on Mac) the song name and select “Add to Playlist” from the pop-up menu.
3. The song will be added to the bottom of the Playlist.
< Removing Songs from a Playlist
You can remove songs from a Playlist as follows:
1. Right-click (CTRL-click on Mac) the song in the Playlist you wish to delete.
2. Select “Remove from Playlist” from the pop-up menu.
3. Torq will remove the song from the Playlist, but the song will remain in the Torq Database (it will not be
deleted from your computer).
< Reordering Songs in a Playlist
The order in which your songs are displayed in the Playlist can be changed.
1. Click and drag the song up or down in the list.
2. If you drag the song on top of another existing song, releasing the mouse button will cause the song to be
inserted above the song in the list.
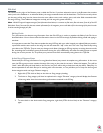
< Activating a Playlist
When you select a Playlist, Torq runs a quick scan of your computer’s drives to ensure all the audio les referenced
by the Playlist are present on the computer. If Torq cannot locate one or more of the songs from the Playlist
(possibly because the drive containing the song is no longer connected to the computer, or the source le has been
deleted), a pop-up dialog will appear with the following message: “Cannot nd one or more of the les used in this
Playlist. What would you like to do?” You will then have a choice of clicking one of the following buttons.
» Ignore: Clicking this button will allow the Playlist to load, however all missing songs will be displayed in red
in the File List window.
» Auto-scan: Clicking this button will cause Torq to search all hard drives connected to your computer in
an attempt to nd the missing le(s). If a le is found with the same name but in a different location, another
dialog box will appear with the following message: “Would you like to use this le for [name of missing
le]?”
1. By choosing “Yes,” Torq will use the le and automatically assume that the rest of the missing les will
also be in this same folder. Once found, these les will automatically be loaded. If the other missing les
are not in this location, Torq will continue searching the computer until another le is found.
2. Choosing “No” will allow the search to continue for another possible le in a different location.
3. If the search completes without nding the proper le, a dialog box will appear with the following
message: “Cannot nd [name of missing le].” When you click “OK” Torq will display the le in red in
the File List, indicating that the song cannot be played. If there are other les to search for, the search
process will continue.
» Manual: Clicking this button will open a standard operating system dialog box that will allow you to manually
search for the audio le on your hard drive(s). Although you are searching for a specic missing le, it is possible
to select any audio le to be used in its place. If you choose a le that is different than the missing le shown in
the File List, the ID3 tag info for the new le will be shown (in the Playlist) in place of the original song.