38
VR800 Owner’s manual (Punch In/Out Recording)
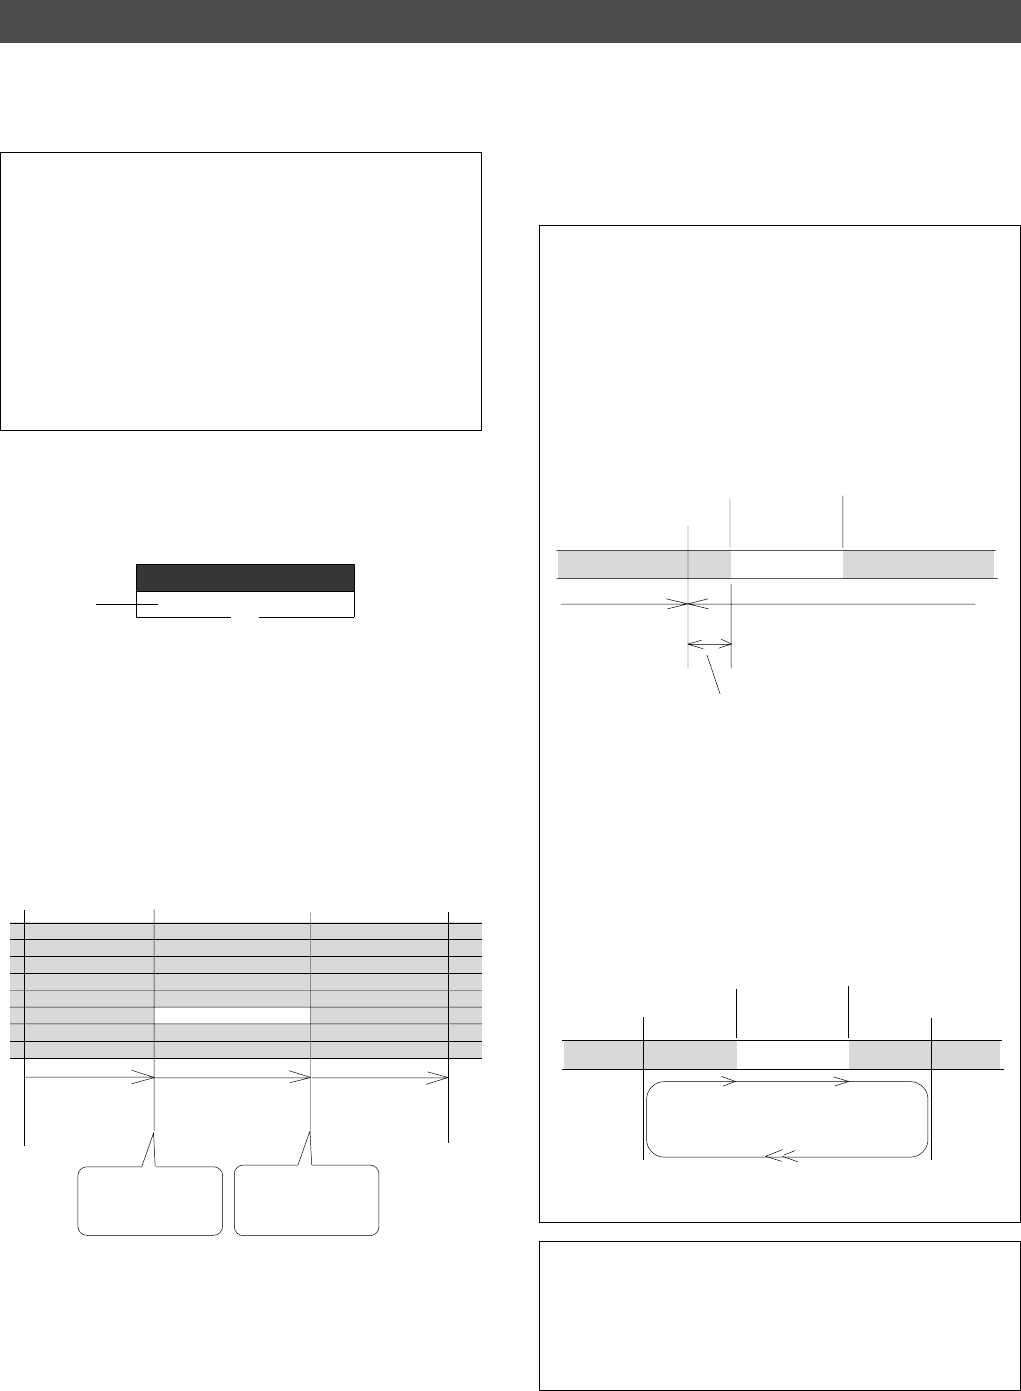
Track 5
Track 6
Track 7
Track 8
Auto Punch In point
(Rehearsal In)
Auto Punch Out point
(Rehearsal Out)
Track 1
Track 2
Track 3
Track 4
This part is changed.
Playback
start point
Playback
end point
Locate
Locate
Stop here.
Auto Punch In point
Auto Punch Out point
The VR800 stops at a point that precedes the Auto
Punch In point by the specified preroll time. (0 - 10
seconds)
Auto Punch In point
Auto Punch Out point
Auto Return Start point
Auto Return End point
Rehearsal area
The VR800 punches in
automatically at the
Punch In point.
The VR800 punches
out automatically at the
Punch Out point.
Playback starts from the Auto Return Start
point, and you can rehearse Auto Punch In/
Out.
All tracks are in playback
monitoring mode.
Only track 3 in input monitor-
ing. The sound is not recorded
at this time. The RECORD
button lamp flashes.
All tracks are in playback
monitoring mode.
<Tips for rehearsal>
Set the preroll value while referring to the “Changing the Initial
Settings (SETUP Mode)” chapter. In this way, the VR800 can locate
a point that precedes the Auto Punch In point by the specified preroll
value. This enables you to start playback slightly before the Punch
In point. (Refer to page 94 for more information on “Changing the
Initial Settings.”) The VR800 will repeat playback data between the
AUTO RTN START point and the AUTO RTN END point if you set
the AUTO RTN START point before the Auto Punch In point and
the AUTO RTN END point after the Auto Punch Out point. This
allows you to repeat rehearsal. See the “Hint-2.”.
When the Auto Return End point is reached, the
VR800 locates the Auto Return Start point.
Note:
If the VR800 display [Over!] when you turn on Auto
Punch mode, the disk does not have enough free space for
Auto Punch In/Out. You need to erase part of the Program
data, then try again.
1. Press the RECORD button while holding down the
SHIFT key.
The [RHSL] indicator flashes in the A.PUNCH mode
indication area of the display. This means that Auto Punch
mode in turned on.
2. Set the track for Auto Punch In/Out to READY.
Press the RECORD RACK select key [3] to set track 3 to
READY.
3. Start playback of the VR800 from a point slightly
before the Auto Punch In point.
The VR800 operates as shown in the figure below during
rehearsal operations.
4. Play the guitar accompanying the playback sound
from tracks 1 - 8 for rehearsal, while adjusting the
recording level.
You will hear the guitar performance between the Auto
Punch In and Out points. Otherwise, you will hear the
recorded guitar sound.
<Hint 1>
Locating a point slightly before the Auto Punch In point
To locate the playback start point for rehearsal, press the AUTO
PUNCH IN key, then press the LOCATE key.
The VR800 displays the time (position) stored in the AUTO PUNCH
IN key, and locates the point and stops.
Press the REWIND button to go backward. If you have set the preroll
time as described on page “94,” you can locate a point that precedes
the Auto Punch In point by the specified preroll value.
<Hint 2>
Quick and easy operation for repeated rehearsal
Using the Auto Return function and the Auto Play function enables
you to rehearse repeatedly.
As shown below, set the AUTO RTN START and END points for
Auto Return and Auto Play. In this way, you can repeat rehearsal
easily, while checking the recording level and concentrating on your
performance.
Refer to page “48” for more information on setting the AUTO RTN
START/END points.
5. When you are satisfied with your rehearsal, press
the STOP button.
Rehearsing Auto Punch In/Out recording
In Rehearsal mode, the READY track assumes input monitoring mode between the Auto Punch In and Out points,
and the sound is not recorded. You can practice Auto Punch In/Out operation repeatedly before you proceed to
actual recording. Locate the recording start position slightly before the Auto Punch In point.
RHSL
A.PUNCH
Flashes


